"Perfect for training your dog to herd sheep and a long lasting rechargeable battery. I like that you can add up to 3 extra collars to train simultaneously and choose from over 7 levels of stimulation levels to fit your dog's temperament. More specs to look forwards to check it out by downloading the fact sheet."
COLIN'S REVIEW
"Perfect for training your dog to herd sheep and a long lasting rechargeable battery. I like that you can add up to 3 extra collars to train simultaneously and choose from over 7 levels of stimulation levels to fit your dog's temperament. More specs to look forwards to check it out by downloading the fact sheet."
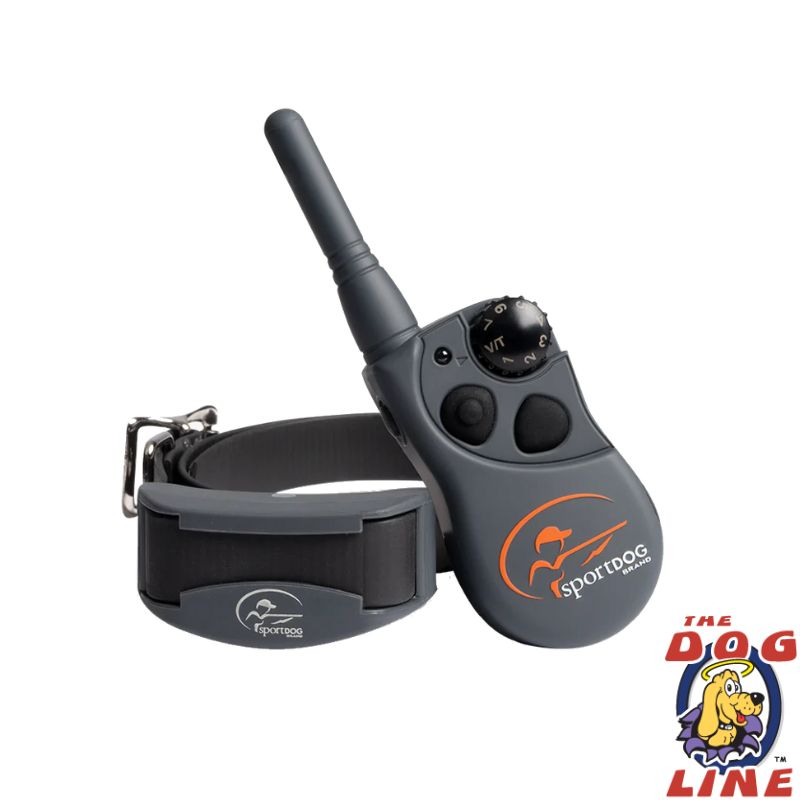
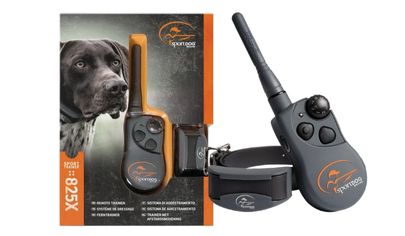
SportDOG Remote Training Collar – SD-425X for Big Dogs
The SportDOG SportTrainer® Remote Trainer – SD-425X is a short-range sport or working dog remote training kit. It offers 14 levels of medium to low stimulation in momentary and continuous mode. It can reach a distance of up to 450m with 3 dogs at the same time with extra receiver collars.
Both receiver collar and remote transmitter are protected with DryTEK Technology so it’s completely waterproof and submersible which lets you train around the beach or in the rain without worrying about water damage.
This kit is best for Small to Large dogs and even has Tone and Vibration stimulation if your dog has been fully trained and is able to respond to the tone or vibration only or when your dog is a bit timid and needs a softer break-in before moving on to the static stimulations. Both receiver collar and remote transmitter feature quick charging capability so you can use them both for 40-60 hours and charge for only 2 hours.
Fully Waterproof and Submersible Receiver Collar and Remote Transmitter – DryTEK Technology
Up to 450m Signal Range
Up to 3 Dogs Simultaneously (With Extra Receiver Collars)
Features 14 Stimulation Levels (Nick and Continuous) and 2 Stimulation Ranges
Features Tone & Vibration Stimulations
Rechargeable Receiver Collar and Remote Transmitter
Quick Recharge Capability – 2 Hour Charge for 40-60 Hours of Use
Low Battery Indicator on both Receiver Collar and Remote Transmitter
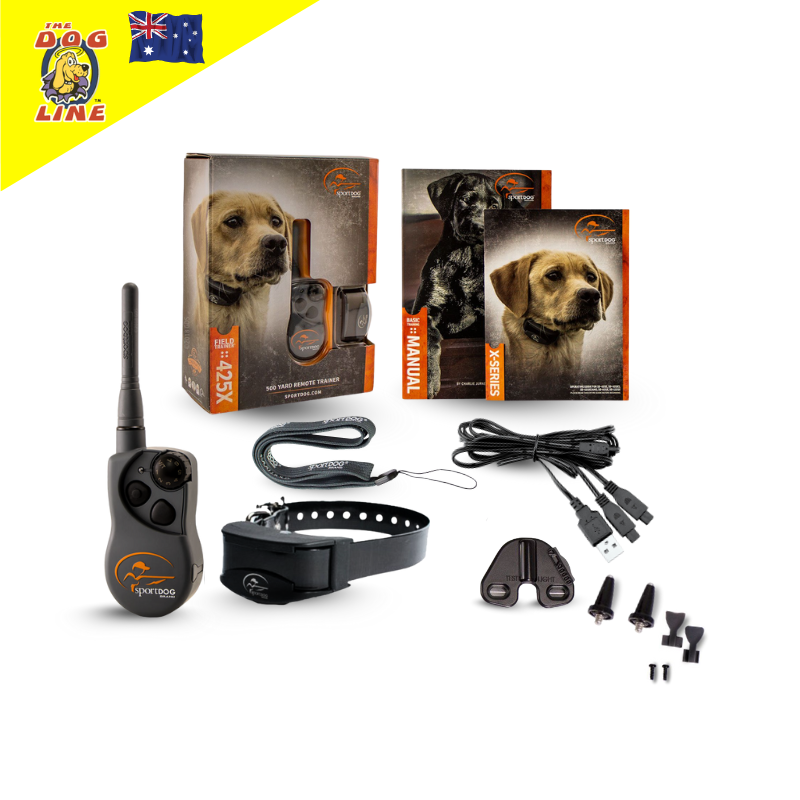
WHAT'S IN THE SPORTDOG KIT?
SportDOG SD-425X Receiver Collar
Adjustable Collar Strap
SportDOG SD-425X Remote Transmitter
USB Twin Charging Cable
Lanyard
Test Light Tool
Contact Probes to Suit Your Dog
Owner’s Manual
Step by Step Training Guide
Model
SD-425X
Correction Method
14 Levels of Static, Tone and Vibration
Waterproof
Yes - Remote and Collar
Dog Size
Small to Extra Large
Strap Size
Up to 60cm
Multiple Dogs
Yes - Up to 3
Battery Status Indicator
Yes
3 YEAR MANUFACTURER’S WARRANTY
Australian distributor 3 year warranty - directed to The Dog Line for easy and fast results.
FULLY WATERPROOF ‘DRYTEK’ – BOTH COLLAR AND REMOTE
With the protection of DryTEK Technology, both SportDOG SD-425X remote transmitter and receiver collar are completely waterproof and submersible. At the beach or on long camping trips.
14 LEVELS OF STATIC CORRECTION
With only minimal movement of the dial and push button, you can easily deliver a static correction from 1 - 14 levels for stubborn dogs on recall.
VIBRATION PAGER - AUDIBLE TONE - 7 LEVELS INCLUDING SNICK AND CONSTANT
Value for your money combined with long-lasting durability and a great warranty. The SportDOG SD-425x Remote Dog Collar is the recent upgrade to add the vibration pager a fast charge battery and longer distance.
7 STIMULATION LEVELS, 2 RANGES, 2 MODES, TONE AND VIBRATION
Snick (Momentary) or Constant stim with a safety cut-out feature. Including a Tone Only or Vibration Pager mode for dogs that are new to the equipment or have been trained well enough to respond correctly.
QUICK CHARGE – 2 HOURS TO CHARGE – UP TO 60 HOURS OF USE
The SportDOG SD-425X is equipped with a high-quality Li-Ion battery that can be quick charged to full capacity in only 2 hours with up to 60hours of use.
ADD-A-DOG – TRAIN UP TO 3 DOGS SIMULTANEOUSLY – ONE BUTTON FOR EACH
SportDOG keeps multiple trained dogs in mind when they design their training equipment. The SD-425X Remote dog training collar is capable of training up to 3 dogs simultaneously. (Extra receiver collar sold separately) including either tone or vibration options.
MID-RANGE SPORTDOG TRAINER – UP TO 450M
The SportDOG SD-425X is designed for mid-range sporting or as a working dog training collar. Great in the field and train your dog to herd sheep.
HOW THE SPORTDOG SD-425X SYSTEM WORKS
Your SportDOG® SD-425X system has been proven safe, comfortable, and effective for all dogs over 3.6 kilograms. Consistent, correct use of this product allows you to reinforce commands and correct misbehaviour as far as 450 metres.
THE COLLAR RECEIVER IS CAPABLE OF DELIVERING FOUR TYPES OF STIMULATION
CONTINUOUS: You control both when and how long static stimulation is delivered, up to a maximum of 10 seconds. After 10 seconds, the stimulation will “time out” and the Transmitter button needs to be released and then pressed again before additional static stimulation can be delivered.
MOMENTARY (NICK): Static stimulation is delivered for 1/10 of a second, regardless of how long the button is pressed.
TONE: The Collar Receiver will make a rapid beeping noise when a Tone button is pressed.*
VIBRATION: The Collar Receiver will vibrate when a Vibration button is pressed, up to a maximum of 10 seconds.*
*Tone and vibration come preset and are not adjustable
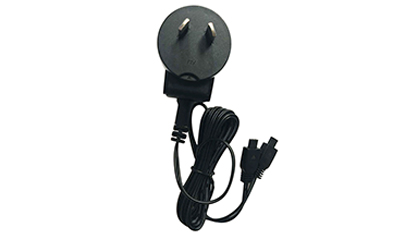
STEP:: 1 CHARGE THE REMOTE TRANSMITTER
1. Lift the rubber cover protecting the Charging Jack and connect the corresponding charge connector.
2. Plug the charger into a standard wall outlet for 2 hours every time you charge.
3. When charging is complete, indicated by the light flashing green once per second, replace the rubber cover.
*Using Li-Ion technology, the Remote Transmitter only requires a 2-hour charge. It is not harmful to let the unit charge for more than 2 hours.
NOTE: Approximate battery life between charges is 50 to 70 hours for SD-425X-E / SD-825X-E.
TRANSMITTER INDICATOR LIGHT
OPERATIONAL MODE
LIGHT COLOUR
BATTERY STATUS
LIGHT FUNCTION
Continuous static, tone, or vibration stimulation button pressed
Green
Good
Light is solid in colour while button is pressed
Continuous static, tone, or vibration stimulation button pressed
Red
Low
Light is solid in colour while button is pressed
Momentary static stimulation button pressed
Green
Good
Light flashes once and turns off
Momentary static stimulation button pressed
Red
Low
Light flashes once and turns off
Unit is charging
Green
Low
Light is solid in colour while on the charger
Unit is fully charged (charger still connected)
Green
Good
Light flashes once per second once the battery is completely charged
STEP::2 CHARGE THE COLLAR RECEIVER
FOR 425X-E or 825X-E
1.Lift the rubber cover protecting the collar Charging Jack and connect the charger.
2. Plug the charger into a standard wall outlet for 2 hours every time you charge. The Receiver Indicator Light will flash green once per second once the battery is completely charged.
3. Remove the charger and secure the rubber cover fully to ensure debris does not enter the Charging Jack.
Using Li-Ion technology, the Collar Receiver only requires a 2-hour charge. It is not harmful to let the unit charge for more than 2 hours.
TO TURN THE COLLAR RECEIVER ON Press and release the On/Off Button. The Collar Receiver Indicator Light will come on and the Collar Receiver will beep 1-2 times for the SD-425X-E / SD-825X-E.
TO TURN THE COLLAR RECEIVER OFF Press and release the On/Off Button. The Receiver Indicator Light comes on solid red and the Collar Receiver beeps for 2 seconds. To extend the life between charging cycles, turn the Collar Receiver off when it is not in use.
RECEIVER INDICATOR LIGHT
OPERATIONAL MODE
LIGHT COLOUR
BATTERY STATUS
LIGHT FUNCTION
SPEAKER FUNCTION
VIBRATION
OUnit is turned on via On/Off button
Green
Good
Light is solid in colour during beep sequence
Beeps 1-2 times (1-3 times for SD-1225X-E & SD-1825X-E) depending on stimulation range setting (2 is the default setting).
N/A
Unit is turned on via On/Off button
Red
Low
Light is solid in colour during beep sequence
Beeps continuously for 2 seconds
N/A
Unit is turned off via On/Off button
Red
N/A
Light is solid in colour during beep sequence
N/A
N/A
Unit is on
Green
Good
Light flashes every 2 seconds
N/A
N/A
Unit is on
Red
Low
Light flashes every 2 seconds
N/A
N/A
Unit is delivering continuous static stimulation
Red
N/A
Light is solid in colour for as long as button is pressed (up to 10 seconds)
N/A
N/A
Unit is delivering momentary static stimulation
Red
N/A
Light will quickly flash once no matter how long button is pressed
Unit will beep for as long as button is pressed
N/A
Unit is delivering tone stimulation
Off
N/A
N/A
N/A
N/A
Unit is delivering vibration stimulation
Off
N/A
N/A
N/A
Unit will vibrate for as long as button is pressed (up to 10 seconds)
Unit is charging
Green
Low
Light is solid in colour while on the charger
N/A
N/A
Unit is fully charged (charger still connected)
Green
Good
Light flashes once per second once the battery is completely charged
N/A
N/A
STEP::3 FIT THE COLLAR RECEIVER
IMPORTANT: THE PROPER FIT AND PLACEMENT OF THE COLLAR RECEIVER IS IMPORTANT FOR EFFECTIVE TRAINING. THE CONTACT POINTS MUST HAVE DIRECT CONTACT WITH YOUR DOG’S SKIN.
To ensure a proper fit, follow these steps:
1. With your dog standing (3A), place the Collar Receiver as high as possible on your dog’s neck, slightly to either side, so the Contact Points are touching the skin (3B). If your dog has a long or thick coat, you have two options to ensure consistent contact: either trim the hair around the Contact Points or switch to the longer Contact Points included with your system.
2. The Collar Receiver should fit snugly, yet loose enough to allow one finger to fit between the strap and your dog’s neck (3C).
3. Allow your dog to wear the collar for several minutes, and then recheck the fit. Check the fit again as your dog becomes more comfortable wearing the Collar Receiver.
STEP::4 FIND THE BEST INTENSITY LEVEL
FINDING YOUR DOG’S RECOGNITION LEVEL NOTE: Every dog is different and you cannot predict where your dog’s Recognition Level will be. Watch closely for any slight change in behaviour that demonstrates your dog is feeling the static stimulation.
1. With the Collar Receiver turned on and properly fitted to your dog, set the Remote Transmitter’s Intensity Dial at Level 1 and press the Continuous Static Stimulation Button for 1 to 2 seconds.
2. If your dog shows no reaction to Level 1, go to Level 2 and repeat the process until you find your dog’s Recognition Level. This is the level you should use when you begin a training exercise.
3. YOUR DOG SHOULD NOT VOCALISE OR PANIC WHEN RECEIVING STATIC STIMULATION. IF THIS HAPPENS, THE STATIC STIMULATION LEVEL IS TOO HIGH AND YOU NEED TO GO BACK TO THE PREVIOUS LEVEL AND REPEAT THE PROCESS.
4. If you have progressed to the highest static stimulation level while searching for your dog’s Recognition Level and your dog continues to show no response, check to see if the Collar Receiver is snug against your dog’s neck. Then go back to Intensity Level 1 and repeat the process. If your dog still does not indicate he is feeling the static stimulation, you have two options: you may either have to trim the hair beneath the Contact Points, or switch to the longer Contact Points included in your system.
If after completing all of these steps your dog still does not indicate he is feeling the static stimulation or if the static stimulation seems too high, you can try changing your Collar Receiver’s stimulation range using the following instructions. Contact the Customer Care Centre if you are not able to find your dog’s Recognition Level.
CHANGING STATIC STIMULATION RANGES
Your SportDOG® Brand Collar Receiver comes with 2-3 static stimulation ranges depending on the model.
In the Remote Transmitter’s default mode there are 14 static stimulation levels within each range, with 1 being the lowest and 14 being the highest. The default range setting is 2 or medium.
To change the range of static stimulation, follow these steps:
1. Make sure the Collar Receiver is off.
2. Then turn the unit on by pressing and releasing the On/Off button.
3. After the Indicator Light turns off and within 5 seconds, press and hold the On/Off button for 3 seconds.
4. The Collar Receiver will then beep and the Indicator Light will flash orange as indicated by the chart below. Continue to hold the button until the number of beeps/orange flashes equals the desired stimulation range shown.
5. Release the button once the desired range is selected; the Collar Receiver will turn off.
6. Turn the unit back on. It will then beep according to the static stimulation range selected in Step 4.
BEEPS
STATIC STIMULATION RANGE
DOG TEMPERAMENT
MODEL
1 beep
Low
Mild
SD-425X-E, SD-825X-E, SD-1225X-E, SD-1825X-E 2 beeps Medium Moderate SD-425X-E, S
2 beeps
Medium
Moderate
SD-425X-E, SD-825X-E, SD-1225X-E, SD-1825X-E 2 beeps Medium Moderate SD-425X-E, S
3 beeps
High
Stubborn
SD-1225X-E, SD-1825X-E
GENERAL TRAINING TIPS BEFORE TRAINING YOUR DOG WITH THIS PRODUCT
You will have the most success using this remote trainer if you always remember to teach a command before trying to reinforce the command with a remote trainer. Your training will be easier and proceed faster if you follow the guidelines in this Operating Guide. In addition, always keep the following training tips in mind:
• Eliminate one misbehaviour or teach one obedience command at a time. If you move too fast with the training, your dog may become confused.
• Keep your training sessions positive, short, and frequent. If you or your dog become frustrated or confused, it’s best to take a break.
• Be consistent. Give your dog a tone, vibration, or static stimulation with each misbehaviour.
• Do not overcorrect your dog. Use as few stimulations as possible to train your dog.
• Restrict your dog from situations in which he has a history of misbehaving unless you can supervise him and use your remote trainer for applying tone, vibration, or static stimulation.
• If you notice one situation in which your dog misbehaves repeatedly, set up this situation as a training session. This will dramatically increase your chances of success.
• If your dog has a timid reaction to the tone, vibration, or static stimulation (especially the first couple of times), do not be alarmed. Redirect his attention to a simple and appropriate behaviour (i.e. a known command, such as “Sit”).
• Never use your remote trainer to correct or eliminate any form of aggressive behaviour. If your dog exhibits such behaviour, contact a professional trainer. Aggression in dogs is the result of many factors – it may be a learned behaviour or it may be brought on as a result of fear. Another factor contributing to aggression in dogs is social dominance. Every dog is different.
At this point, your remote trainer is ready to use.
STEP::5 PROGRAM THE REMOTE TRANSMITTER
FOR SD-425X-E, SD-825X-E, SD-1225X-E
Your Remote Transmitter has seven operational modes to allow you to select the best match for your type or style of training. There is also one programming mode (Mode V/T) which allows you to change the system’s ID code. The Remote Transmitter is factory set to mode 5.
TO CHANGE THE MODE
1. Referring to the following table, adjust the Intensity Dial to your desired mode.
2. Turn the Remote Transmitter over and remove the belt clip if attached (SD-825X-E and SD-1225X-E only).
3. Using a pen or the tine on the buckle of your collar strap, press and release the Mode Button. When the Mode Button is pressed, the Transmitter Indicator Light will be solid in colour. When it is released, it will flash the mode selected.
For example, if mode 6 is desired, adjust the Intensity Dial to Level 6. Once the Mode Button has been depressed, the Transmitter Indicator Light will be solid, and once the Mode Button is released, the Transmitter Indicator Light will flash 6 times.
SD-425X-E, SD-825X-E, SD-1225X-E MODE CHART
MODE
UPPER BUTTON FUNCTION
LOWER BUTTON FUNCTION
SIDE BUTTON FUNCTION
NUMBER OF DOGS
1
Continuous stimulation (Level set by Intensity Dial) OR Vibe if V/T on dia
Momentary stimulation (Level set by Intensity Dial) OR Vibe if V/T on dial
Tone only
1
2
Continuous stimulation (Level set by Intensity Dial) OR Tone if V/T on dial
Momentary stimulation (Level set by Intensity Dial) OR Tone if V/T on dial
Vibe only
1
3
Dog 1: Continuous stimulation (Level set by Intensity Dial) OR Tone if V/T on dial
Dog 2: Continuous stimulation (Level set by Intensity Dial) OR Tone if V/T on dial
Dog 3: Continuous stimulation (Level set by Intensity Dial) OR Tone if V/T on dial
3
4
Dog 1: Continuous stimulation (Level set by Intensity Dial) OR Vibe if V/T on dial
Dog 2: Continuous stimulation (Level set by Intensity Dial) OR Vibe if V/T on dial
Dog 3: Continuous stimulation (Level set by Intensity Dial) OR Vibe if V/T on dial
3
5
Medium Continuous stimulation (Level set by Intensity Dial) OR Tone if V/T on dial
Low Continuous stimulation (Level set by Intensity Dial) OR Tone if V/T on dial
High Continuous stimulation (Level set by Intensity Dial) OR Tone if V/T on dial
1
6
Medium Continuous stimulation (Level set by Intensity Dial) OR Vibe if V/T on dial
Low Continuous stimulation (Level set by Intensity Dial) OR Vibe if V/T on dial
High Continuous stimulation (Level set by Intensity Dial) OR Vibe if V/T on dial
1
7
Continuous stimulation (Level set by Intensity Dial) OR Tone if V/T on dial
Momentary stimulation (Level set by Intensity Dial) OR Tone if V/T on dial
Locate Remote Beeper**
1
V/T
(IDCODE)
N/A
N/A
See STEP 08
N/A
**NOTE: Modes 1, 2, 3, 4 and 7 provide 7 levels of stimulation, which correspond to the setting of the Intensity Dial.
Modes 5 and 6 provide more “increments” to choose from – a total of 14 levels of static stimulation. For example, in mode 5 with the Intensity Dial set at 1, the Lower Button provides level 1 of 14, the Upper Button provides level 2 of 14, and the Side Button provides level 3 of 14.
* Factory Default Mode.
** Locate Remote Beeper: The Side Button turns run mode off and locates the Remote Beeper. To enable run mode again, press and hold the Side Button for 3 seconds.
STEP::6 MATCH THE COLLAR RECEIVER AND REMOTE TRANSMITTER
To match the Collar Receiver to work with a new Remote Transmitter or to reprogram a new Collar Receiver to work with your existing Remote Transmitter:
1. Turn off the Collar Receiver.
2. Press and hold the On/Off Button. The Receiver Indicator Light will come on, then turn off after 4-5 seconds. If the On/Off Button is released too early, the Receiver Indicator Light will begin flashing as normal. If this occurs, start again from Step 1.
3. After the Receiver Indicator Light has turned off, release the On/Off Button.
4. Press and hold the Upper Button on the Remote Transmitter until the Receiver Indicator Light flashes 5 times. Once the Receiver Indicator Light has flashed 5 times, the Collar Receiver has been matched and will begin flashing as normal. If the Receiver Indicator Light does not flash 5 times, start again from Step 1.
STEP::7 PROGRAM THE SYSTEM FOR MULTI-DOG OPERATION
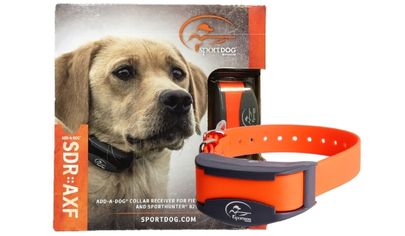
SD-425X-E, SD-825X-E, SD-1225X-E SportDOG® Add-A-Dog® Collar Receiver(s) must be purchased to train two or three additional dogs.
1. Program the Remote Transmitter to mode 3 or 4 (see TO CHANGE THE MODE on page 10).
2. Program the first Collar Receiver.
A. Turn off the Collar Receiver.
B. Press and hold the On/Off Button. The Receiver Indicator Light will come on, then turn off in 4-5 seconds. If the On/Off Button is released too early, the Receiver Indicator Light will begin its normal flashing. If this occurs, start again and repeat from Step A.
C. After the Receiver Indicator Light has turned off, release the On/Off Button.
D. Press and hold the Upper Button on the Remote Transmitter until the Receiver Indicator Light flashes 5 times. If the Receiver Indicator Light does not flash 5 times, start again and repeat from Step A.
3. Program the second Collar Receiver by following Steps A through D above, but using the Lower Button in place of the Upper Button.
4. Program the third Collar Receiver by following Steps A through D above, but using the Side Button in place of the Upper Button.
STEP::8 CHANGE ID CODES
An ID Code is the signal identification between the Remote Transmitter and Collar Receiver. Each is programmed in 1 of 2,000 ID Codes from the factory. The Remote Transmitter has the flexibility to program two or more Remote Transmitters to the same ID Code, allowing them to control one Collar Receiver. There are 64 programmable ID Codes available.
TO MANUALLY PROGRAM A REMOTE TRANSMITTER’S ID CODE
1. Turn the Intensity Dial to V/T and then press and release the Mode Button on the back of your Remote Transmitter. This does not change the mode, so the current mode will still be active after the ID change is complete.
2. Once the Mode Button is released, the Transmitter Indicator Light will illuminate solid green and stay on for 15 seconds.
3. While the green Indicator Light is on, turn the Intensity Dial to select the 1st digit of the ID and then press and release the Side Button. The green Indicator Light will flash rapidly confirming selection.
4. Again, while the green Indicator Light is on, turn the Intensity Dial to select the 2nd digit of the ID and then press and release the Side Button. The green Indicator Light will flash rapidly confirming selection. The 2nd digit is optional and, if not desired, wait until the green light turns off and refrain from pressing the Side Button.
5. At the end of 15 seconds, or after the second press of the Side Button, the green Indicator Light will turn off and the ID of the Remote Transmitter will be updated. At this point, the Remote Transmitter will be in the same mode it was in prior to setting the ID.
6. Upon changing the ID Code, you will need to match the Collar Receiver to the Remote Transmitter (see STEP 06).
NOTE: If you press the Side Button only once (skipping Step 4) the ID is still a two digit ID. The left digit is defaulted to 1. For example, if you selected 6 in Step 3 and pressed the Side Button only once, the ID you get will be 16.
TO RETURN THE REMOTE TRANSMITTER TO THE FACTORY ID
1. Turn the Intensity Dial to V/T and then press and release the Mode Button on the back of your Remote Transmitter. This does not change the mode, so the current mode will still be active after the ID change is complete.
2. Do not press any buttons and wait until the green Transmitter Indicator Light turns off.
3. You will need to match the Collar Receiver to the Remote Transmitter (see STEP 06). ACCESSORIES To purchase additional accessories for your SportDOG® Remote Trainer, contact the Customer Care Centre 1300 843 364.
FREQUENTLY ASKED QUESTIONS
Is the static stimulation safe for my dog?
While Continuous or Momentary static stimulation may be unpleasant, it is harmless to your dog. Electronic training devices require interaction and training from the owner to achieve desired results.
How old does a dog have to be before using this remote trainer?
Age is not as important as your dog’s developmental ability to learn. Your dog should be able to learn basic obedience commands such as “Sit” or “Stay.” The Collar Receiver may be too large for dogs under 3.6 kilograms
Once my dog is trained and has been obeying my commands, will my dog have to continue to wear the Collar Receiver?
Your dog may need to wear the Collar Receiver from time to time for reinforcement. Also, many hunters keep the Collar Receiver on their dogs while hunting for maximum control because they possess a high drive and experience many distractions while in the field.
Is the Collar Receiver waterproof?
Yes. If the rechargeable battery pack ever needs to be replaced, make sure the o-ring and o-ring groove are free from dirt and debris
Can my Collar Receiver be used around salt water?
If the Collar Receiver is used in or around salt water, the Collar Receiver should be rinsed with fresh water following each use
Can I use this remote trainer with more than one dog?
Yes, your remote trainer is expandable to a maximum of 3 dogs (up to 6 dogs for SD-1825X-E). SportDOG® Add-A-Dog® Collar Receivers must be purchased. Please refer to page 15 for a list of compatible Collar Receivers.
Can I use this remote trainer on aggressive dogs?
We do not recommend any of our products to be used on aggressive dogs. We recommend you contact your local veterinarian or professional trainer if you believe your dog might be aggressive
Will I get the exact range claimed with this remote trainer?
The range you get with your remote trainer will vary according to terrain, weather, vegetation, as well as transmission from other radio devices. To get the maximum amount of range, please refer to “How the System Works” section of this guide.
How long can I continuously deliver static stimulation to my dog?
The maximum amount of time you can press the Continuous Static Stimulation Button and deliver static stimulation to your dog continuously is 10 seconds. After 10 seconds, the Remote Transmitter will “time-out,” and the Continuous Static Stimulation Button must be released and pressed again
What do I do if my dog’s neck becomes red and irritated?
This condition is due to the Contact Points irritating the skin. Discontinue use of the Collar Receiver for a few days. If the condition persists for over 48 hours, see your veterinary surgeon. Once the skin returns to normal, resume use and monitor the skin condition closely. Avoid leaving the collar on your dog for more than 12 hours per day.
The Intensity Dial seems difficult to rotate. Is this normal?
Yes. This prevents accidental changes in intensity and encourages an optimal waterproof seal. The knob will “break in” and be slightly easier to turn as you use it.
Can I attach a lead to this remote trainer?
DO NOT attach a lead to your remote trainer. You may put a separate non-metallic collar on your dog’s neck and attach a lead. Be sure the extra collar does not interfere with the Contact Points.
My Remote Transmitter is sending a signal to more than one Collar Receiver unintentionally, what should I do?
In the rare event this occurs, you can change your Remote Transmitter’s ID Code (see STEP 08).
TROUBLESHOOTING
The answers to these questions should help you solve any problem you have with this system. If they do not, please contact the Customer Care Centre 1300 THE DOG or 1300 843 364.
My dog is not responding when I press a button.
• Check to see if the Collar Receiver has been turned on and the Indicator Light is flashing.
• If your range has reduced from the first time you have used it, please check to see if the battery is low in either the Remote Transmitter or Collar Receiver.
• Many factors can impact the range you have with your system. For a list of these factors, please refer to “How the System Works”.
• You can verify the Collar Receiver is delivering static stimulation to your dog by placing the test light, enclosed in your kit, on the Collar Receiver. Please refer to the “Test Light Instructions” section for details.
• Increase the Intensity Dial. Refer to “Find the Best Intensity Level” for your dog for more information.
• Increase the Static Stimulation Range. Refer to “Changing Static Stimulation Ranges” for more information.
• Make sure the Collar Receiver’s Contact Points are placed snugly against your dog’s skin. Refer to “Fit the Collar Receiver” for more information.
• You may need to switch to the longer Contact Points included with your system or trim the hair beneath the Contact Points. Never shave the dog’s neck.
• If you notice your operating time dropping to about half the original time, your Collar Receiver battery needs to be replaced. Contact the Customer Care Centre 1300 843 364 to purchase a new one.
The Collar Receiver will not turn on.
• Make sure the Collar Receiver has been charged. The Collar Receiver will charge in 2 hours.
The Collar Receiver is not responding to the Remote Transmitter.
• Make sure the Remote Transmitter has been charged. The Remote Transmitter will charge in 2 hours.
• Verify the Collar Receiver has been turned on and the Indicator Light is flashing. Refer to “To Turn the Collar Receiver On and Off.”
• Refer to “Match the Collar Receiver and Remote Transmitter.
TEST LIGHT INSTRUCTIONS
Should you need to test your system, follow these instructions:
1. Turn on the Collar Receiver.
2. Hold the Test Light Contacts to the Contact Points.
3. Press a Static Stimulation Button on the Remote Transmitter.
4. The Test Light will flash. NOTE: At higher static stimulation levels, the Test Light will flash brighter.
5. Turn off the Collar Receiver. Save the Test Light for future testing.
NOTE: If the Test Light does not flash, recharge the battery and re-test. If the Test Light still does not flash, contact the Customer Care Centre 1300 843 364.
BATTERY
This system operates on two Li-Ion battery packs. Only replace with battery received from calling the Customer Care Centre.
• Batteries should never be removed from the battery compartment for charging.
• The rechargeable Lithium Ion (Li-Ion) batteries are not memory sensitive, do not require depletion before charging, and cannot be over charged.
• The batteries come partially charged from the factory, but will require a full charge before the first use.
• When storing the unit for long periods, remember to regularly give batteries a full charge. This should be done once every 3 to 4 months.
• You should expect hundreds of recharge cycles from your batteries. However, all rechargeable batteries lose capacity over time relative to the number of recharge cycles they experience. This is normal. If your operating time drops to half of the original life, contact the Customer Care Centre to purchase a new battery.
• The batteries should last for a period of 3-5 years. When a battery needs replacement, you can order a new pack by calling our Customer Care Centre. Please do not open the Collar Receiver or Remote Transmitter until you have received the replacement. Separate collection of spent batteries is required in many regions; check the regulations in your area before discarding spent batteries.
Please see below for instructions on how to remove the battery from the product for separate disposal.
AT END OF PRODUCT LIFE, USE THESE BATTERY REMOVAL INSTRUCTIONS FOR FINAL DISPOSAL (DO NOT OPEN THE COLLAR RECEIVER OR REMOTE TRANSMITTER UNTIL YOU HAVE RECEIVED THE REPLACEMENT).
1. Using a #1 Phillips screwdriver for your Remote Transmitter and/or a 3/32 Hex Key for your Collar Receiver, remove the case screws.
2. Remove the case back or cover.
3. Remove the old battery pack.
These instructions are not valid for repair or battery replacement. To avoid invalidating your warranty, please call the Customer Care Centre for help in replacing your battery with one that is specifically approved by Radio Systems Corporation.
Here at The Dog Line, we guarantee that our prices either match the prices of competitor’s or beat them. We also offer a lot of other Reasons to Buy besides a price match guarantee.
If you see an Australian competitor having lower prices than us, simply fill in the form below with all the details and we’ll beat their price! On top of that, we will give you an *exclusive 10% discount of the difference.
Sample
Calculation
Our Price
=
$130
Other Price
=
$80
Difference
=
$50
Discount
10% of $50 =
$5
Final Price for You
=
$75
To make the deal even sweeter for you, we'll also take into consideration the postage on the final price of the item!
SportDOG Remote Training Collar – SD-425X for Big Dogs
The SportDOG SportTrainer® Remote Trainer – SD-425X is a short-range sport or working dog remote training kit. It offers 14 levels of medium to low stimulation in momentary and continuous mode. It can reach a distance of up to 450m with 3 dogs at the same time with extra receiver collars.
Both receiver collar and remote transmitter are protected with DryTEK Technology so it’s completely waterproof and submersible which lets you train around the beach or in the rain without worrying about water damage.
This kit is best for Small to Large dogs and even has Tone and Vibration stimulation if your dog has been fully trained and is able to respond to the tone or vibration only or when your dog is a bit timid and needs a softer break-in before moving on to the static stimulations. Both receiver collar and remote transmitter feature quick charging capability so you can use them both for 40-60 hours and charge for only 2 hours.
Australian distributor 3 year warranty - directed to The Dog Line for easy and fast results.
FULLY WATERPROOF ‘DRYTEK’ – BOTH COLLAR AND REMOTE
With the protection of DryTEK Technology, both SportDOG SD-425X remote transmitter and receiver collar are completely waterproof and submersible. At the beach or on long camping trips.
14 LEVELS OF STATIC CORRECTION
With only minimal movement of the dial and push button, you can easily deliver a static correction from 1 - 14 levels for stubborn dogs on recall.
VIBRATION PAGER - AUDIBLE TONE - 7 LEVELS INCLUDING SNICK AND CONSTANT
Value for your money combined with long-lasting durability and a great warranty. The SportDOG SD-425x Remote Dog Collar is the recent upgrade to add the vibration pager a fast charge battery and longer distance.
7 STIMULATION LEVELS, 2 RANGES, 2 MODES, TONE AND VIBRATION
Snick (Momentary) or Constant stim with a safety cut-out feature. Including a Tone Only or Vibration Pager mode for dogs that are new to the equipment or have been trained well enough to respond correctly.
QUICK CHARGE – 2 HOURS TO CHARGE – UP TO 60 HOURS OF USE
The SportDOG SD-425X is equipped with a high-quality Li-Ion battery that can be quick charged to full capacity in only 2 hours with up to 60hours of use.
ADD-A-DOG – TRAIN UP TO 3 DOGS SIMULTANEOUSLY – ONE BUTTON FOR EACH
SportDOG keeps multiple trained dogs in mind when they design their training equipment. The SD-425X Remote dog training collar is capable of training up to 3 dogs simultaneously. (Extra receiver collar sold separately) including either tone or vibration options.
MID-RANGE SPORTDOG TRAINER – UP TO 450M
The SportDOG SD-425X is designed for mid-range sporting or as a working dog training collar. Great in the field and train your dog to herd sheep.
Your SportDOG® SD-425X system has been proven safe, comfortable, and effective for all dogs over 3.6 kilograms. Consistent, correct use of this product allows you to reinforce commands and correct misbehaviour as far as 450 metres.
THE COLLAR RECEIVER IS CAPABLE OF DELIVERING FOUR TYPES OF STIMULATION
CONTINUOUS: You control both when and how long static stimulation is delivered, up to a maximum of 10 seconds. After 10 seconds, the stimulation will “time out” and the Transmitter button needs to be released and then pressed again before additional static stimulation can be delivered.
MOMENTARY (NICK): Static stimulation is delivered for 1/10 of a second, regardless of how long the button is pressed.
TONE: The Collar Receiver will make a rapid beeping noise when a Tone button is pressed.*
VIBRATION: The Collar Receiver will vibrate when a Vibration button is pressed, up to a maximum of 10 seconds.*
*Tone and vibration come preset and are not adjustable
STEP:: 1 CHARGE THE REMOTE TRANSMITTER
1. Lift the rubber cover protecting the Charging Jack and connect the corresponding charge connector.
2. Plug the charger into a standard wall outlet for 2 hours every time you charge.
3. When charging is complete, indicated by the light flashing green once per second, replace the rubber cover.
*Using Li-Ion technology, the Remote Transmitter only requires a 2-hour charge. It is not harmful to let the unit charge for more than 2 hours.
NOTE: Approximate battery life between charges is 50 to 70 hours for SD-425X-E / SD-825X-E.
TRANSMITTER INDICATOR LIGHT
OPERATIONAL MODE
LIGHT COLOUR
BATTERY STATUS
LIGHT FUNCTION
Continuous static, tone, or vibration stimulation button pressed
Green
Good
Light is solid in colour while button is pressed
Continuous static, tone, or vibration stimulation button pressed
Red
Low
Light is solid in colour while button is pressed
Momentary static stimulation button pressed
Green
Good
Light flashes once and turns off
Momentary static stimulation button pressed
Red
Low
Light flashes once and turns off
Unit is charging
Green
Low
Light is solid in colour while on the charger
Unit is fully charged (charger still connected)
Green
Good
Light flashes once per second once the battery is completely charged
STEP::2 CHARGE THE COLLAR RECEIVER
FOR 425X-E or 825X-E
1.Lift the rubber cover protecting the collar Charging Jack and connect the charger.
2. Plug the charger into a standard wall outlet for 2 hours every time you charge. The Receiver Indicator Light will flash green once per second once the battery is completely charged.
3. Remove the charger and secure the rubber cover fully to ensure debris does not enter the Charging Jack.
Using Li-Ion technology, the Collar Receiver only requires a 2-hour charge. It is not harmful to let the unit charge for more than 2 hours.
TO TURN THE COLLAR RECEIVER ON Press and release the On/Off Button. The Collar Receiver Indicator Light will come on and the Collar Receiver will beep 1-2 times for the SD-425X-E / SD-825X-E.
TO TURN THE COLLAR RECEIVER OFF Press and release the On/Off Button. The Receiver Indicator Light comes on solid red and the Collar Receiver beeps for 2 seconds. To extend the life between charging cycles, turn the Collar Receiver off when it is not in use.
RECEIVER INDICATOR LIGHT
OPERATIONAL MODE
LIGHT COLOUR
BATTERY STATUS
LIGHT FUNCTION
SPEAKER FUNCTION
VIBRATION
OUnit is turned on via On/Off button
Green
Good
Light is solid in colour during beep sequence
Beeps 1-2 times (1-3 times for SD-1225X-E & SD-1825X-E) depending on stimulation range setting (2 is the default setting).
N/A
Unit is turned on via On/Off button
Red
Low
Light is solid in colour during beep sequence
Beeps continuously for 2 seconds
N/A
Unit is turned off via On/Off button
Red
N/A
Light is solid in colour during beep sequence
N/A
N/A
Unit is on
Green
Good
Light flashes every 2 seconds
N/A
N/A
Unit is on
Red
Low
Light flashes every 2 seconds
N/A
N/A
Unit is delivering continuous static stimulation
Red
N/A
Light is solid in colour for as long as button is pressed (up to 10 seconds)
N/A
N/A
Unit is delivering momentary static stimulation
Red
N/A
Light will quickly flash once no matter how long button is pressed
Unit will beep for as long as button is pressed
N/A
Unit is delivering tone stimulation
Off
N/A
N/A
N/A
N/A
Unit is delivering vibration stimulation
Off
N/A
N/A
N/A
Unit will vibrate for as long as button is pressed (up to 10 seconds)
Unit is charging
Green
Low
Light is solid in colour while on the charger
N/A
N/A
Unit is fully charged (charger still connected)
Green
Good
Light flashes once per second once the battery is completely charged
N/A
N/A
STEP::3 FIT THE COLLAR RECEIVER
IMPORTANT: THE PROPER FIT AND PLACEMENT OF THE COLLAR RECEIVER IS IMPORTANT FOR EFFECTIVE TRAINING. THE CONTACT POINTS MUST HAVE DIRECT CONTACT WITH YOUR DOG’S SKIN.
To ensure a proper fit, follow these steps:
1. With your dog standing (3A), place the Collar Receiver as high as possible on your dog’s neck, slightly to either side, so the Contact Points are touching the skin (3B). If your dog has a long or thick coat, you have two options to ensure consistent contact: either trim the hair around the Contact Points or switch to the longer Contact Points included with your system.
2. The Collar Receiver should fit snugly, yet loose enough to allow one finger to fit between the strap and your dog’s neck (3C).
3. Allow your dog to wear the collar for several minutes, and then recheck the fit. Check the fit again as your dog becomes more comfortable wearing the Collar Receiver.
STEP::4 FIND THE BEST INTENSITY LEVEL
FINDING YOUR DOG’S RECOGNITION LEVEL NOTE: Every dog is different and you cannot predict where your dog’s Recognition Level will be. Watch closely for any slight change in behaviour that demonstrates your dog is feeling the static stimulation.
1. With the Collar Receiver turned on and properly fitted to your dog, set the Remote Transmitter’s Intensity Dial at Level 1 and press the Continuous Static Stimulation Button for 1 to 2 seconds.
2. If your dog shows no reaction to Level 1, go to Level 2 and repeat the process until you find your dog’s Recognition Level. This is the level you should use when you begin a training exercise.
3. YOUR DOG SHOULD NOT VOCALISE OR PANIC WHEN RECEIVING STATIC STIMULATION. IF THIS HAPPENS, THE STATIC STIMULATION LEVEL IS TOO HIGH AND YOU NEED TO GO BACK TO THE PREVIOUS LEVEL AND REPEAT THE PROCESS.
4. If you have progressed to the highest static stimulation level while searching for your dog’s Recognition Level and your dog continues to show no response, check to see if the Collar Receiver is snug against your dog’s neck. Then go back to Intensity Level 1 and repeat the process. If your dog still does not indicate he is feeling the static stimulation, you have two options: you may either have to trim the hair beneath the Contact Points, or switch to the longer Contact Points included in your system.
If after completing all of these steps your dog still does not indicate he is feeling the static stimulation or if the static stimulation seems too high, you can try changing your Collar Receiver’s stimulation range using the following instructions. Contact the Customer Care Centre if you are not able to find your dog’s Recognition Level.
CHANGING STATIC STIMULATION RANGES
Your SportDOG® Brand Collar Receiver comes with 2-3 static stimulation ranges depending on the model.
In the Remote Transmitter’s default mode there are 14 static stimulation levels within each range, with 1 being the lowest and 14 being the highest. The default range setting is 2 or medium.
To change the range of static stimulation, follow these steps:
1. Make sure the Collar Receiver is off.
2. Then turn the unit on by pressing and releasing the On/Off button.
3. After the Indicator Light turns off and within 5 seconds, press and hold the On/Off button for 3 seconds.
4. The Collar Receiver will then beep and the Indicator Light will flash orange as indicated by the chart below. Continue to hold the button until the number of beeps/orange flashes equals the desired stimulation range shown.
5. Release the button once the desired range is selected; the Collar Receiver will turn off.
6. Turn the unit back on. It will then beep according to the static stimulation range selected in Step 4.
BEEPS
STATIC STIMULATION RANGE
DOG TEMPERAMENT
MODEL
1 beep
Low
Mild
SD-425X-E, SD-825X-E, SD-1225X-E, SD-1825X-E 2 beeps Medium Moderate SD-425X-E, S
2 beeps
Medium
Moderate
SD-425X-E, SD-825X-E, SD-1225X-E, SD-1825X-E 2 beeps Medium Moderate SD-425X-E, S
3 beeps
High
Stubborn
SD-1225X-E, SD-1825X-E
GENERAL TRAINING TIPS BEFORE TRAINING YOUR DOG WITH THIS PRODUCT
You will have the most success using this remote trainer if you always remember to teach a command before trying to reinforce the command with a remote trainer. Your training will be easier and proceed faster if you follow the guidelines in this Operating Guide. In addition, always keep the following training tips in mind:
• Eliminate one misbehaviour or teach one obedience command at a time. If you move too fast with the training, your dog may become confused.
• Keep your training sessions positive, short, and frequent. If you or your dog become frustrated or confused, it’s best to take a break.
• Be consistent. Give your dog a tone, vibration, or static stimulation with each misbehaviour.
• Do not overcorrect your dog. Use as few stimulations as possible to train your dog.
• Restrict your dog from situations in which he has a history of misbehaving unless you can supervise him and use your remote trainer for applying tone, vibration, or static stimulation.
• If you notice one situation in which your dog misbehaves repeatedly, set up this situation as a training session. This will dramatically increase your chances of success.
• If your dog has a timid reaction to the tone, vibration, or static stimulation (especially the first couple of times), do not be alarmed. Redirect his attention to a simple and appropriate behaviour (i.e. a known command, such as “Sit”).
• Never use your remote trainer to correct or eliminate any form of aggressive behaviour. If your dog exhibits such behaviour, contact a professional trainer. Aggression in dogs is the result of many factors – it may be a learned behaviour or it may be brought on as a result of fear. Another factor contributing to aggression in dogs is social dominance. Every dog is different.
At this point, your remote trainer is ready to use.
STEP::5 PROGRAM THE REMOTE TRANSMITTER
FOR SD-425X-E, SD-825X-E, SD-1225X-E
Your Remote Transmitter has seven operational modes to allow you to select the best match for your type or style of training. There is also one programming mode (Mode V/T) which allows you to change the system’s ID code. The Remote Transmitter is factory set to mode 5.
TO CHANGE THE MODE
1. Referring to the following table, adjust the Intensity Dial to your desired mode.
2. Turn the Remote Transmitter over and remove the belt clip if attached (SD-825X-E and SD-1225X-E only).
3. Using a pen or the tine on the buckle of your collar strap, press and release the Mode Button. When the Mode Button is pressed, the Transmitter Indicator Light will be solid in colour. When it is released, it will flash the mode selected.
For example, if mode 6 is desired, adjust the Intensity Dial to Level 6. Once the Mode Button has been depressed, the Transmitter Indicator Light will be solid, and once the Mode Button is released, the Transmitter Indicator Light will flash 6 times.
SD-425X-E, SD-825X-E, SD-1225X-E MODE CHART
MODE
UPPER BUTTON FUNCTION
LOWER BUTTON FUNCTION
SIDE BUTTON FUNCTION
NUMBER OF DOGS
1
Continuous stimulation (Level set by Intensity Dial) OR Vibe if V/T on dia
Momentary stimulation (Level set by Intensity Dial) OR Vibe if V/T on dial
Tone only
1
2
Continuous stimulation (Level set by Intensity Dial) OR Tone if V/T on dial
Momentary stimulation (Level set by Intensity Dial) OR Tone if V/T on dial
Vibe only
1
3
Dog 1: Continuous stimulation (Level set by Intensity Dial) OR Tone if V/T on dial
Dog 2: Continuous stimulation (Level set by Intensity Dial) OR Tone if V/T on dial
Dog 3: Continuous stimulation (Level set by Intensity Dial) OR Tone if V/T on dial
3
4
Dog 1: Continuous stimulation (Level set by Intensity Dial) OR Vibe if V/T on dial
Dog 2: Continuous stimulation (Level set by Intensity Dial) OR Vibe if V/T on dial
Dog 3: Continuous stimulation (Level set by Intensity Dial) OR Vibe if V/T on dial
3
5
Medium Continuous stimulation (Level set by Intensity Dial) OR Tone if V/T on dial
Low Continuous stimulation (Level set by Intensity Dial) OR Tone if V/T on dial
High Continuous stimulation (Level set by Intensity Dial) OR Tone if V/T on dial
1
6
Medium Continuous stimulation (Level set by Intensity Dial) OR Vibe if V/T on dial
Low Continuous stimulation (Level set by Intensity Dial) OR Vibe if V/T on dial
High Continuous stimulation (Level set by Intensity Dial) OR Vibe if V/T on dial
1
7
Continuous stimulation (Level set by Intensity Dial) OR Tone if V/T on dial
Momentary stimulation (Level set by Intensity Dial) OR Tone if V/T on dial
Locate Remote Beeper**
1
V/T
(IDCODE)
N/A
N/A
See STEP 08
N/A
**NOTE: Modes 1, 2, 3, 4 and 7 provide 7 levels of stimulation, which correspond to the setting of the Intensity Dial.
Modes 5 and 6 provide more “increments” to choose from – a total of 14 levels of static stimulation. For example, in mode 5 with the Intensity Dial set at 1, the Lower Button provides level 1 of 14, the Upper Button provides level 2 of 14, and the Side Button provides level 3 of 14.
* Factory Default Mode.
** Locate Remote Beeper: The Side Button turns run mode off and locates the Remote Beeper. To enable run mode again, press and hold the Side Button for 3 seconds.
STEP::6 MATCH THE COLLAR RECEIVER AND REMOTE TRANSMITTER
To match the Collar Receiver to work with a new Remote Transmitter or to reprogram a new Collar Receiver to work with your existing Remote Transmitter:
1. Turn off the Collar Receiver.
2. Press and hold the On/Off Button. The Receiver Indicator Light will come on, then turn off after 4-5 seconds. If the On/Off Button is released too early, the Receiver Indicator Light will begin flashing as normal. If this occurs, start again from Step 1.
3. After the Receiver Indicator Light has turned off, release the On/Off Button.
4. Press and hold the Upper Button on the Remote Transmitter until the Receiver Indicator Light flashes 5 times. Once the Receiver Indicator Light has flashed 5 times, the Collar Receiver has been matched and will begin flashing as normal. If the Receiver Indicator Light does not flash 5 times, start again from Step 1.
STEP::7 PROGRAM THE SYSTEM FOR MULTI-DOG OPERATION
SD-425X-E, SD-825X-E, SD-1225X-E SportDOG® Add-A-Dog® Collar Receiver(s) must be purchased to train two or three additional dogs.
1. Program the Remote Transmitter to mode 3 or 4 (see TO CHANGE THE MODE on page 10).
2. Program the first Collar Receiver.
A. Turn off the Collar Receiver.
B. Press and hold the On/Off Button. The Receiver Indicator Light will come on, then turn off in 4-5 seconds. If the On/Off Button is released too early, the Receiver Indicator Light will begin its normal flashing. If this occurs, start again and repeat from Step A.
C. After the Receiver Indicator Light has turned off, release the On/Off Button.
D. Press and hold the Upper Button on the Remote Transmitter until the Receiver Indicator Light flashes 5 times. If the Receiver Indicator Light does not flash 5 times, start again and repeat from Step A.
3. Program the second Collar Receiver by following Steps A through D above, but using the Lower Button in place of the Upper Button.
4. Program the third Collar Receiver by following Steps A through D above, but using the Side Button in place of the Upper Button.
STEP::8 CHANGE ID CODES
An ID Code is the signal identification between the Remote Transmitter and Collar Receiver. Each is programmed in 1 of 2,000 ID Codes from the factory. The Remote Transmitter has the flexibility to program two or more Remote Transmitters to the same ID Code, allowing them to control one Collar Receiver. There are 64 programmable ID Codes available.
TO MANUALLY PROGRAM A REMOTE TRANSMITTER’S ID CODE
1. Turn the Intensity Dial to V/T and then press and release the Mode Button on the back of your Remote Transmitter. This does not change the mode, so the current mode will still be active after the ID change is complete.
2. Once the Mode Button is released, the Transmitter Indicator Light will illuminate solid green and stay on for 15 seconds.
3. While the green Indicator Light is on, turn the Intensity Dial to select the 1st digit of the ID and then press and release the Side Button. The green Indicator Light will flash rapidly confirming selection.
4. Again, while the green Indicator Light is on, turn the Intensity Dial to select the 2nd digit of the ID and then press and release the Side Button. The green Indicator Light will flash rapidly confirming selection. The 2nd digit is optional and, if not desired, wait until the green light turns off and refrain from pressing the Side Button.
5. At the end of 15 seconds, or after the second press of the Side Button, the green Indicator Light will turn off and the ID of the Remote Transmitter will be updated. At this point, the Remote Transmitter will be in the same mode it was in prior to setting the ID.
6. Upon changing the ID Code, you will need to match the Collar Receiver to the Remote Transmitter (see STEP 06).
NOTE: If you press the Side Button only once (skipping Step 4) the ID is still a two digit ID. The left digit is defaulted to 1. For example, if you selected 6 in Step 3 and pressed the Side Button only once, the ID you get will be 16.
TO RETURN THE REMOTE TRANSMITTER TO THE FACTORY ID
1. Turn the Intensity Dial to V/T and then press and release the Mode Button on the back of your Remote Transmitter. This does not change the mode, so the current mode will still be active after the ID change is complete.
2. Do not press any buttons and wait until the green Transmitter Indicator Light turns off.
3. You will need to match the Collar Receiver to the Remote Transmitter (see STEP 06). ACCESSORIES To purchase additional accessories for your SportDOG® Remote Trainer, contact the Customer Care Centre 1300 843 364.
FREQUENTLY ASKED QUESTIONS
Is the static stimulation safe for my dog?
While Continuous or Momentary static stimulation may be unpleasant, it is harmless to your dog. Electronic training devices require interaction and training from the owner to achieve desired results.
How old does a dog have to be before using this remote trainer?
Age is not as important as your dog’s developmental ability to learn. Your dog should be able to learn basic obedience commands such as “Sit” or “Stay.” The Collar Receiver may be too large for dogs under 3.6 kilograms
Once my dog is trained and has been obeying my commands, will my dog have to continue to wear the Collar Receiver?
Your dog may need to wear the Collar Receiver from time to time for reinforcement. Also, many hunters keep the Collar Receiver on their dogs while hunting for maximum control because they possess a high drive and experience many distractions while in the field.
Is the Collar Receiver waterproof?
Yes. If the rechargeable battery pack ever needs to be replaced, make sure the o-ring and o-ring groove are free from dirt and debris
Can my Collar Receiver be used around salt water?
If the Collar Receiver is used in or around salt water, the Collar Receiver should be rinsed with fresh water following each use
Can I use this remote trainer with more than one dog?
Yes, your remote trainer is expandable to a maximum of 3 dogs (up to 6 dogs for SD-1825X-E). SportDOG® Add-A-Dog® Collar Receivers must be purchased. Please refer to page 15 for a list of compatible Collar Receivers.
Can I use this remote trainer on aggressive dogs?
We do not recommend any of our products to be used on aggressive dogs. We recommend you contact your local veterinarian or professional trainer if you believe your dog might be aggressive
Will I get the exact range claimed with this remote trainer?
The range you get with your remote trainer will vary according to terrain, weather, vegetation, as well as transmission from other radio devices. To get the maximum amount of range, please refer to “How the System Works” section of this guide.
How long can I continuously deliver static stimulation to my dog?
The maximum amount of time you can press the Continuous Static Stimulation Button and deliver static stimulation to your dog continuously is 10 seconds. After 10 seconds, the Remote Transmitter will “time-out,” and the Continuous Static Stimulation Button must be released and pressed again
What do I do if my dog’s neck becomes red and irritated?
This condition is due to the Contact Points irritating the skin. Discontinue use of the Collar Receiver for a few days. If the condition persists for over 48 hours, see your veterinary surgeon. Once the skin returns to normal, resume use and monitor the skin condition closely. Avoid leaving the collar on your dog for more than 12 hours per day.
The Intensity Dial seems difficult to rotate. Is this normal?
Yes. This prevents accidental changes in intensity and encourages an optimal waterproof seal. The knob will “break in” and be slightly easier to turn as you use it.
Can I attach a lead to this remote trainer?
DO NOT attach a lead to your remote trainer. You may put a separate non-metallic collar on your dog’s neck and attach a lead. Be sure the extra collar does not interfere with the Contact Points.
My Remote Transmitter is sending a signal to more than one Collar Receiver unintentionally, what should I do?
In the rare event this occurs, you can change your Remote Transmitter’s ID Code (see STEP 08).
TROUBLESHOOTING
The answers to these questions should help you solve any problem you have with this system. If they do not, please contact the Customer Care Centre 1300 THE DOG or 1300 843 364.
My dog is not responding when I press a button.
• Check to see if the Collar Receiver has been turned on and the Indicator Light is flashing.
• If your range has reduced from the first time you have used it, please check to see if the battery is low in either the Remote Transmitter or Collar Receiver.
• Many factors can impact the range you have with your system. For a list of these factors, please refer to “How the System Works”.
• You can verify the Collar Receiver is delivering static stimulation to your dog by placing the test light, enclosed in your kit, on the Collar Receiver. Please refer to the “Test Light Instructions” section for details.
• Increase the Intensity Dial. Refer to “Find the Best Intensity Level” for your dog for more information.
• Increase the Static Stimulation Range. Refer to “Changing Static Stimulation Ranges” for more information.
• Make sure the Collar Receiver’s Contact Points are placed snugly against your dog’s skin. Refer to “Fit the Collar Receiver” for more information.
• You may need to switch to the longer Contact Points included with your system or trim the hair beneath the Contact Points. Never shave the dog’s neck.
• If you notice your operating time dropping to about half the original time, your Collar Receiver battery needs to be replaced. Contact the Customer Care Centre 1300 843 364 to purchase a new one.
The Collar Receiver will not turn on.
• Make sure the Collar Receiver has been charged. The Collar Receiver will charge in 2 hours.
The Collar Receiver is not responding to the Remote Transmitter.
• Make sure the Remote Transmitter has been charged. The Remote Transmitter will charge in 2 hours.
• Verify the Collar Receiver has been turned on and the Indicator Light is flashing. Refer to “To Turn the Collar Receiver On and Off.”
• Refer to “Match the Collar Receiver and Remote Transmitter.
TEST LIGHT INSTRUCTIONS
Should you need to test your system, follow these instructions:
1. Turn on the Collar Receiver.
2. Hold the Test Light Contacts to the Contact Points.
3. Press a Static Stimulation Button on the Remote Transmitter.
4. The Test Light will flash. NOTE: At higher static stimulation levels, the Test Light will flash brighter.
5. Turn off the Collar Receiver. Save the Test Light for future testing.
NOTE: If the Test Light does not flash, recharge the battery and re-test. If the Test Light still does not flash, contact the Customer Care Centre 1300 843 364.
BATTERY
This system operates on two Li-Ion battery packs. Only replace with battery received from calling the Customer Care Centre.
• Batteries should never be removed from the battery compartment for charging.
• The rechargeable Lithium Ion (Li-Ion) batteries are not memory sensitive, do not require depletion before charging, and cannot be over charged.
• The batteries come partially charged from the factory, but will require a full charge before the first use.
• When storing the unit for long periods, remember to regularly give batteries a full charge. This should be done once every 3 to 4 months.
• You should expect hundreds of recharge cycles from your batteries. However, all rechargeable batteries lose capacity over time relative to the number of recharge cycles they experience. This is normal. If your operating time drops to half of the original life, contact the Customer Care Centre to purchase a new battery.
• The batteries should last for a period of 3-5 years. When a battery needs replacement, you can order a new pack by calling our Customer Care Centre. Please do not open the Collar Receiver or Remote Transmitter until you have received the replacement. Separate collection of spent batteries is required in many regions; check the regulations in your area before discarding spent batteries.
Please see below for instructions on how to remove the battery from the product for separate disposal.
AT END OF PRODUCT LIFE, USE THESE BATTERY REMOVAL INSTRUCTIONS FOR FINAL DISPOSAL (DO NOT OPEN THE COLLAR RECEIVER OR REMOTE TRANSMITTER UNTIL YOU HAVE RECEIVED THE REPLACEMENT).
1. Using a #1 Phillips screwdriver for your Remote Transmitter and/or a 3/32 Hex Key for your Collar Receiver, remove the case screws.
2. Remove the case back or cover.
3. Remove the old battery pack.
These instructions are not valid for repair or battery replacement. To avoid invalidating your warranty, please call the Customer Care Centre for help in replacing your battery with one that is specifically approved by Radio Systems Corporation.
Here at The Dog Line, we guarantee that our prices either match the
prices of competitor’s or beat them. We also offer a lot of other Reasons
to Buy besides a price match guarantee.
If you see an Australian competitor having lower prices than us, simply fill in the form
below with all the details and we’ll beat their price! On top of that, we will give
you an *exclusive 10% discount
of the difference.
Sample
Calculation
Our Price
=
$130
Other Price
=
$80
Difference
=
$50
Discount
10% of $50 =
$5
Final Price for You
=
$75
To make the deal even sweeter for you, we'll also take into consideration the postage on the final price
of the item!
Fill in the form below and we'll contact you for the price match.
All your need is: 1) An Australian Visa or Mastercard debit/credit card; 2) To be over 18 years of age; 3)
Valid verifiable email address and mobile number; 4) Legal capacity to enter into a binding
contract: 5) Credit checks apply
Read Afterpay's complete terms, visit: https://www.afterpay.com/en-AU/terms-of-service
 The Dogline