 The Dogline


SAME DAY SHIPPING!
Hurry offer expires in


Pet Barrier Owner's Club


How to Install an Electric Dog Fence
The Pet Barrier Electric Dog Fence Kit is a top shelf Electric Dog Fence System that comes with everything you need right out of the box. Paired with our installation techniques and layouts customised to suit your property along with training and our 7 day helpline, this ensures that your dog is effectively and safely contained inside your property.
DOWNLOAD OUR DOG FENCE MANIFEST
Our 7 Point Buyer's Guide, Plus...
5 Questions our Competitors DONT Want You to Ask
We give your dog the freedom it deserves and take away all the stress
There's a lot of options out there we know, and getting it wrong can end up costing more in the long run.
Feel free to call and chat to one of our Dog Fence Specialists to 1300 843 364.
You can also fill in the form below and tell us about your dog and property.
We will get back to you and send through our Dog Fence Buying Guide and Pricing
Discover More about the Importance of
- * Lightning Damage Warranty
- * Regulated Power Supply
- * HDPe Coated Wire (Australian Made)
- * Coded Digital FM Radio Frequencies.
- * The Anti Linger Feature and Battery Life ($)
- * The Chew Warranty
- * Reaction times and 'Anti Run Through'
- * Tri Aerial System
- * Gentle Steps Training for Success


Receiving Your Kit - What do you do first?
How to Change Levels on the Dog Fence Collar: What the Dog Feels
Using the Test Light to See the Collar Correcting
How to Change the Distance of the Radio Signal - The Range Control
The Dog Fence Collars - The Receiver.
The Dog Fence Transmitter
How to Stop a Dog Fence Signal
How to Install The Dog Fence Transmitter - Groundskeeper
The 1200 Transmitter - Dog Fence for Large Properties
How to Install Dog Fence Boundary Wire
- General Notes on Installing the Dog Fence Wire.
- How high off the ground will the Wire go
- How Deep do I bury the wire
- Some Special Boundary wire Installation Tips and Tricks.
- How to cancel the dog fence radio signal. Neutralise the Radio Signal
- How to get the wire across a Driveway
- Gardens
How the Invisible Fence Works - Putting it all Together
Turn it on and Set the Radio Signal Boundary Distance
Receiving Your Kit - What do you do first?
Your kit is all wired up and ready to use, so before running the wire it would be best to get familiar with a few things.
Grab a coffee, Plug the Transformer (Power Supply) into a normal power plug. Then hold the receiver collar up to the ‘Test Loop’ on the transmitter.
Things to do.
1. Plug the transformer into a normal power supply
2. Learn how to change the levels on the collar which is what the dog feels.
3. You can use the multi-tool... Test light/Magnet to do 4 things.
- Change the levels
- Show the collar ‘zapping’ with the test light
- Remove the battery lid
- Tighten up the Probes with the little spanner insert.
4. Then look at how to adjust the ‘Range (radio signal distance) on the transmitter’
How to change levels on the Dog Fence collar: What the dog feels
- On the right-hand side of the collar, toward the top there will be two little notches (big dog collar) or a small groove (little dog collar)
- If you touch the magnet end (solid metal piece) of the multitool to this area the collar should beep at you
- The Number of beeps tells you the level of the collar.
- The Collar will change levels IF you leave the magnet in place - When it gets to the top level it goes back to level Zero… Beeping only.
- it will then keep cycling through the levels if you leave the magnet there.
- To set the collar at the level you want, take the magnet away.
Give it a try.
Note. We feel this sensation differently to dogs (more intensely) We have oily thin skin. dogs have dry thick skin and a layer of hair… But. It will be a bit of a surprise to your dog initially - like getting a ping from a shopping trolley. (but we cover this in the training guide).
Using the Test Light to See the Collar Correcting
The test light will ONLY work if the collar is inside the radio signal - you can hear the collar beeping and then see the test light flashing.
- Look for the slots in the multi tool where you can see the 2 wires.
- place the 2 wires on the probes that will touch the dogs skin.
- Now hold the multi tool in place... while you approach the test loop on the transmitter (or the external Surge box)
- When you reach the small test signal - the collar and test light should react.
Note: There is only a small radio signal around the Test Loop on the transmitter - due to the small amount of test wire.
This will expand once you get the wire set up and all connected on the fence. We are just practicing here
How to Change the Distance of the Radio Signal - The Range Control
Look for the dial on the transmitter that adjusts the radio signal distance. “The Range”
Either “Range” on the right side of the T1200 Kit
Or the Plus and Minus symbols underneath the smaller Pet Barrier Dog Fence Kit.
Use a small flat object (e.g. A flat head screwdriver)
To increase the distance turn the range dial clockwise. (Righty-Tighty)
To reduce the distance go the other way “anti Clockwise”
Note: There is only a small radio signal around the test loop on the transmitter - due to the small amount of test wire. This will expand once you get the wire set up and all connected on the fence. We are just practicing here.
The Invisible Dog Fence Distance. How to test it.
- Once you have run the wire you can test the pet fence Distance
- Get someone to stand at the fence holding the collar where you want the dogs to stop.
- While you slowly increase the radio signal until they hear the collar beep. You do not need to change the range after this.
- You should expect around 1.5 - 2m of signal.
- The first 10% of the signal is the warning zone - The distance for the warning zone cannot be changed.
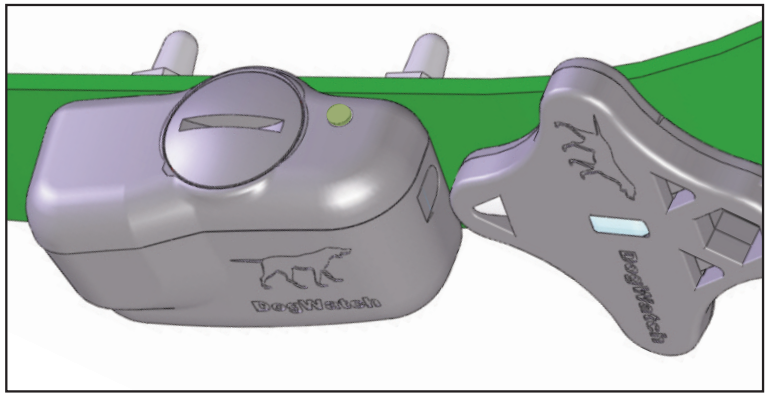
The Dog Fence Collars - The Receiver
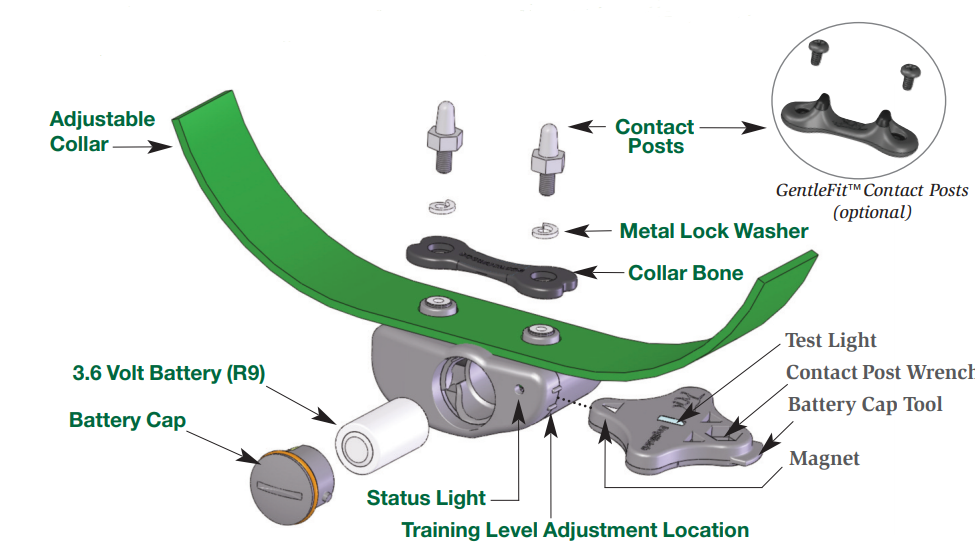
The Receiver attached to the dog’s collar will give the dog a warning beeper and a correction as it approaches the radio signal from the wire.
► How Do I Fit the Dog Fence Collar to My Dog?
Adjust the length of the collar to ensure the 2 probes are touching the dog’s skin.
Keep the dog in the standing position when adjusting the length.
Check the fit every now and then, as the hair may alter the fit.
► How Tight Should The Pet Fence Collar Be?
The 2 probes will deliver the training corrections. The 2 probes must be touching the dog’s skin… Approximately the same pressure you use to feel your pulse.
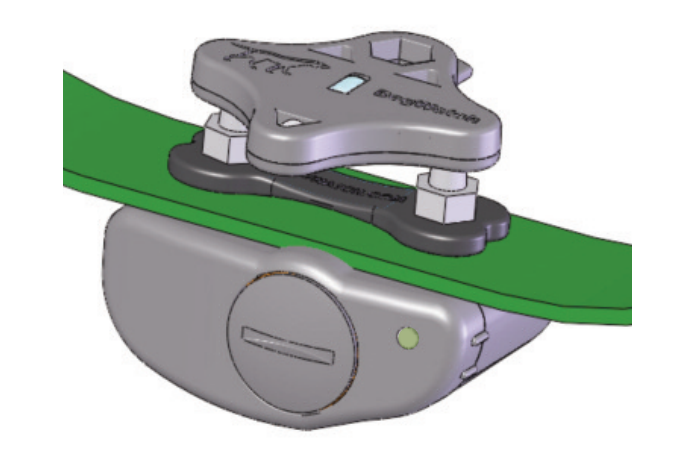
The Fence Receiver collar can come off this strap and go on any other strap. Using the multitool.
Ensure the collar is set to level Zero until you have tested and set the radio signal depth and are ready to start the training
► How To Avoid Sores To My Dogs Neck ‘Pressure Necrosis’
This event is not common if you use some simple and common sense checking.
Some dogs may develop a sore where the probes are touching the skin. On rare occasions, it could be a rubbing sore or maybe some sort of irritation or an allergy. Note: Electric Dog Collars do not burn a dog’s neck.
We recommend that you Check Regularly. Especially in the initial stages of implementing the system.
- Do not have the collar done up too tight.
- Do not tether the dog using the Dog Fence Collar.
- Check the skin daily to ensure there is no visible signs of irritation
- Every 8-12 hours is recommended.
- The Dog Fence Collar can be fitted so that it can move freely and still have good contact with the skin.
The reason why it is noted to not have the collar on the dog for longer than 8-12 hours… is so that you check the skin for irritation regularly.
If irritation occurs remove the collar and seek assistance from a vet if necessary.
The Dog Fence Transmitter
Locate the transmitter out of the weather and undercover, so it does not get wet. A shed, a garage or meter box, where a normal power point is handy. (it is best to have a dedicated power source so that the system is not turned off accidentally)
► How does the radio signal work?
The Dog Fence Transmitter, sends the radio signal down the boundary wire. The wire must return to the transmitter in one continuous loop. When the radio signal returns, the transmitter's job is to block the signal.
The signal is trapped inside the wire. When you adjust the range control dial you add more radio signal. It will start to expand out from the wire.
How to Stop a Dog Fence Signal
The 2 wires touching together from the transmitter to the boundary will neutralise the signal.
- If you are running one single wire around the property - you cannot neutralise or stop the dog fence signal.
- If you are running a double loop you can control the signal distance by moving the wires closer together or cancel the signal if both wires are touching.
- The signal is going UP the wire and the DOWN the other wire. With the signal heading in opposite directions, it will cancel the signal out.
How to Install The Dog Fence Transmitter - Groundskeeper
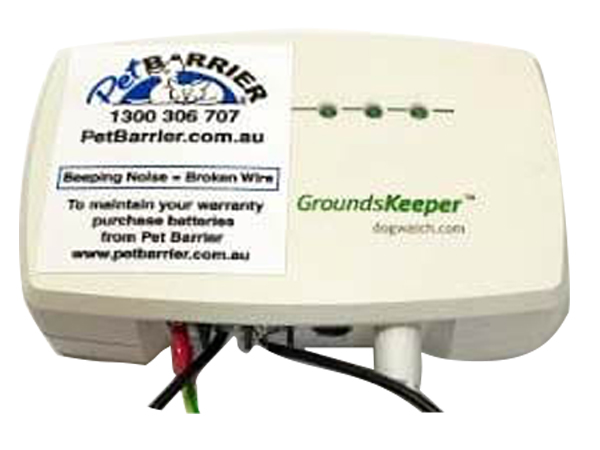
Locate the Transformer (Power Plug) and the Transmitter out of the weather where it will not get wet.
A well-ventilated area - Ensure insects do not get the opportunity to make a home inside the transmitter.
The Transmitter can sit on the wall using the ‘keyhole’ slots and screws provided.
► How to Attach the Boundary Wire to the Dog Fence Transmitter
First remove the Test Loop.
Attach your 2 boundary Wires, one to the left screw and one to the right screw. Tighten the screws down to hold your wire.
Excess boundary wire should be cut and left on the roll for future use.
► Beeping Transmitter - Broken Wire
- If the transmitter is beeping it means a broken wire.
If the transmitter does NOT beep when the wire is disconnected… there is a problem. A beeping transmitter is a healthy transmitter (usually)
► Adjusting the Radio Signal Distance.
As Above. The Range Controller is underneath the transmitter – Look at the Positive and minus sign. This will control the depth of the radio signal. Use a small flat object (e.g. A flat head screwdriver)
To increase the distance turn the range dial clockwise. (Righty-Tighty)
To reduce the distance go the other way “anti Clockwise”
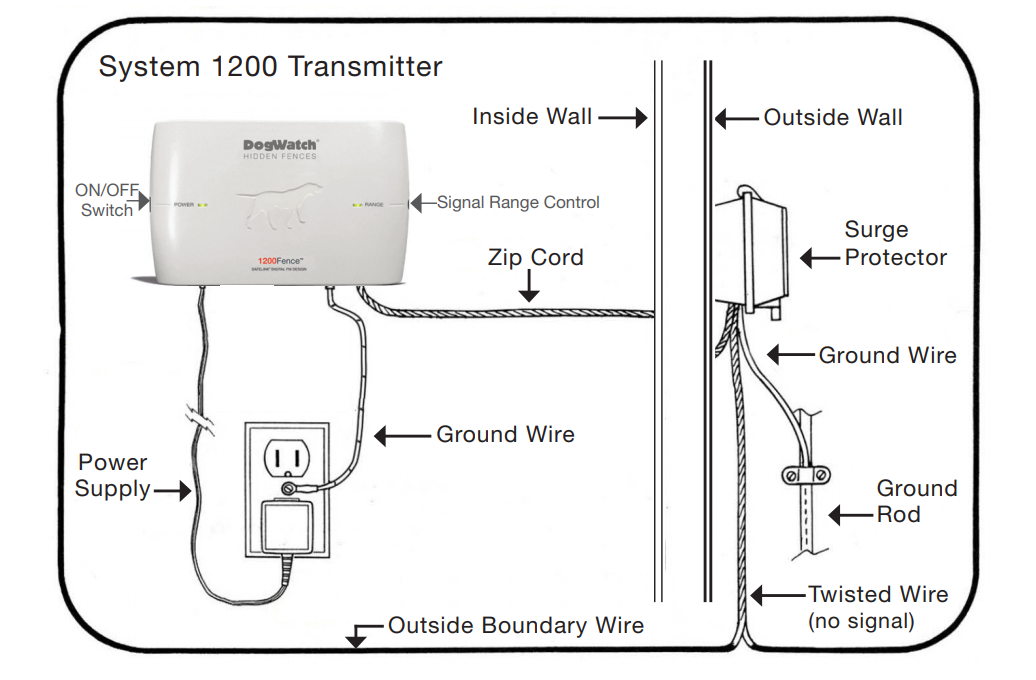
The 1200 Transmitter - Dog Fence for Large Properties
By now, you would have tested everything and be familiar with the collar and the transmitter before installation.
This is the larger property system, which includes
- The transformer (Power Supply)
- The Transmitter
- The external grey box - The surge protector. (this is best outside - it is ok to be in the rain)
Locate the Transformer (Power Plug) and the Transmitter out of the weather where it will not get wet.
A well-ventilated area - Ensure insects do not get the opportunity to make a home inside the transmitter.
The Transmitter can sit on the wall using the ‘keyhole’ slots and screws provided.
► The External Surge Protector. (The Grey Box)
This is a junction box that will divert any lightning strike energy away from your transmitter to the earth wire.
This can be placed anywhere - But ideally, it should be close to the transmitter (just outside at ground level)
- Attach the External Lightning protector to the wall or a fence post using screws or cable ties.
- The green earth WIre must be attached to any metal object that is earthed to the ground.
- Do not attach it to a copper pipe connected to the house or a water pump.
► The white Zip Cord Wires
The Zip Cord. (White Wire) Can be unplugged from the transmitter using the ‘Release Clip’ OR, cut about 20cm from the grey box. This will allow you to locate the Grey box. You can reconnect it later and remove any excess Zip Cord.
Feed the Zip Cord outside, to where you will locate the External Surge Protector.
- You can extend the ‘Zip Cord’ to locate the Surge protector in a different location. OR.
- You can cut off any excess Zip cord.
► How to Attach the Boundary Wire to the Surge Protector
First, remove the Test Loop - this is where you attach the boundary wires
Feed the boundary wire through the base.
- Attach your 2 boundary Wires, one to the left Pin and one to the right Pin between the washers. Tighten the nuts down to hold the wire firm.
►Beeping Transmitter - Broken Wire
- If the transmitter is beeping it means a broken wire.
If the transmitter does NOT beep when the wire is disconnected… there is a problem. A beeping transmitter is a healthy transmitter (usually)
► Adjusting the Radio Signal Distance.
After you have run the Boundary Wire you can adjust the distance.
The Range/distance Controller is on the right side of the transmitter – This will control the depth of the radio signal at the fence.
Use a small flat object (e.g. A small flat head screwdriver)
To increase the distance turn the range dial clockwise. (Righty-Tighty)
To reduce the distance go the other way “anti Clockwise”
How to install the Dog Fence Boundary Wire
Our Boundary wire is quite unique. It is Made In Australia, exclusively for The Dog Line and Pet Barrier.
The HDPE (High Density Polyethylene) has a 20Yr UV rating, it can be attached to the fence and sit in the sun off the ground.
If the coating on a wire breaks down in the sun, the copper can short out the signal if it touches the fence.
If you move house you can roll it all up and take it with you.
General Notes on Installing the Dog Fence Wire.
You can put the wire anywhere. We recommend leaving it above ground where possible.
- It Does NOT need to be isolated from the fence
- DO NOT attach it directly to an Electric Fence wire.
- You may want to read about Colorbond fences and the Radio Signal (most systems will not work with colourbond fences.)
Invisible Fence for Dogs - I do not have any Fences at all
No Stress.
Our Invisible fence collar has a much faster reaction time and the pulse rate from the transmitter makes it a more intense sensation. But… Training is the key to success.
You are training your dog for that time that something exciting shows up on the other side of the invisible boundary.
Luke… Use the flags Luke - use the Flags. May the Flags be with you.
Here are a few pointers to follow if you are using the system as an invisible fence for your dog.
- I would recommend a few extra days on our Gentle steps training program.
- Really focus on the ‘Temptation’ Training Phase before letting your dog go free
- Try to use the terrain to create a visual reference for your dog. Follow a line of bushes or trees.
- Use the edge of a line of bushes as the visual boundary. So place the wire about 1-2metres inside the bush.
- Try to leave the wire above ground (laying the boundary wire on the ground is fine) where possible for easy maintenance and checking
- See our tips on installing invisible dog Fence above.
How to use the training Flags with an Invisible dog fence.
The training flags are a visual reference to the dog.
- Follow the Pet barrier Training Guide.
- Put the flags about 10cm inside the ‘Correction Zone’ (if the dog is sniffing the flag they are at least getting the warning beepers)
- Place the flags gradually. As you complete each small training session in one section at a time.
- Once you can walk down the line and the dog is aware of the fences - you can put the flags out as you go.
- The Training flags can be removed after a month or so
- Put them in your pot plants to keep the dog away.
- Give them to your neighbours as they have our phone number on them.
- Don't let kids play with them… the metal stem can be hazardous.
How to attach the Boundary wire to the Fence.
Ideally, attaching the wire to the fence is awesome. It acts as a physical Barrier and visual reference for the dogs
How High off the Ground Will the Wire go?
High enough so the Rabbits can’t reach it and you don't break your back installing it.
(Remember the radio signal is a full circle around the wire approx 1 - 2m from the wire. Depending on the range you set.
Our signal can be turned right down to zero and has no minimum distance.
Attach the boundary wire to the fence with anything - as long as you do not pierce the HDPE coating. You can also weave it through your fence as you run it around the property.
How Deep do I bury the wire?
If you bury the wire you only need to go 10 - 15cm deep depending on the soil.
On a driveway only chip into the driveway about 15cm and cover the wire with the dirt to be compacted in. No need to use a conduit unless you have very loose gravel.
Some Special self install Boundary wire - Tips and Tricks.
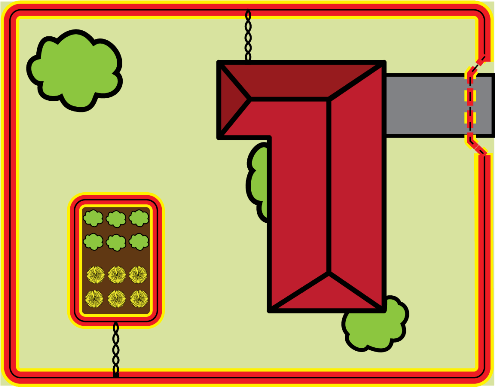
1. Come Up The Driveway. Push your dog further back from the open gate.
If you run the wire up the sides of the driveway for about 1-2m you will push the dog further away from the open gate. Some people run the boundary wire up the driveway 4m or so. This helps to stop the dogs jumping all over people and cars when they enter the property.
You can manipulate the radio signal by running the wire to where you need to go.
See twisting the Dog Fence wire to neutralize the signal.
2. Expansion Loops - Every 40-50m
Leave a small loop of wire (20cm or so) attached to the fence with a couple of cable ties. (they should look like a Bow Tie sitting on the fence). If anything pulls on the wire this expansion loop will unfold and help prevent breaks.
3. Poly Pipe - Anywhere the wire disappears underground.
Encase the wire in a 1m length of common garden poly pipe. Half Bury this pipe and cable tie it to the fence. This will make the wire easy to see and protect it from damage.
How to cancel the dog fence radio signal. Neutralise the Radio Signal
There is no way of canceling a dog fence radio signal. Unless you have 2 wires to twist together lightly. (Or, just drop the 2 wires together in a trench there is no real need to twist them).
To cancel the dog fence radio signal the radio signal must travel up one wire and back down the other wire in the opposite direction. The closer the 2 wires are together the less signal you will have.
Twisting or touching the wires together between the Transmitter and Surge Protection Box and the boundary will cancel the signal.
Your dog will be able to walk across these 2 wires.
.
How to get the wire across a Driveway
Bring the wire up the driveway 1-2metres to push your dog further away from the open gate.
- You can bury the wire 15cm or so across a gateway.
- Use ‘Selley’s Mortar Based Silicon’ which has different colours to match your driveway if you need to secure the wire. (brush the dust back over the silicon to make it almost invisible.
- If you are at the edge of a driveway or lawn remember to sink the wire a bit deeper to avoid any lawn edgers or whipper snippers cutting the wire.
- See our tip on Poly Pipe above (anchor link here)
Concrete Driveways and Dog Fence wire
It is best to lay the wire in an expansion joint/gap.
Clean out the dirt, lay the wire in the gap and push the dirt back. You can deepen the expansion joint if needed using an angle grinder.
Sometimes the Rio (Reinforcing Metal) in the concrete can cause the signal to diminish or even travel through concrete and pop up somewhere else. See Signal Coupling.
To compensate for this you can run the wire up the side of the driveway so the signal from the outside wires will cover the driveway.
Bitumen Driveways or Asphalt
It is best to use an Angle grinder with a masonry or diamond blade to cut a thin line across the driveway.
Again… come up the driveway.
You only need to cut about 3mm deep straight across.
Poke the wire into this cut with a small screwdriver.
Put a bead of ‘Selley’s Mortar Based Silicon’ across the cut using the same colour as your driveway.
Brush the dust back over the silicon to match it in nicely.
*You can cover the wire with something temporarily and drive over it. (but then that just becomes another job on the list… if possible, Bite the bullet and do it all in one sitting.
Brick Paving
You can either lift the pavers and drop them back on top of the wire.
Or… Use an angle grinder to clean out the gaps between the pavers and drop the wire in. Brush the dirt back over it.
Be careful at the edges to make sure the wire is not exposed to lawn Edgers and the Whipper Snipper.
Lawn - Getting across a lawn
How to keep a dog off the garden - See How to stop the dog fence signal. Insert image of the garden bed video - meta how-to-stop-a-dog-digging-in-the-garden
You may need to travel across lawn with one wire or a twisted wire
Use a straight-edged spade or lawn edger to slice or cut a narrow split in the lawn approx 5cm deep, place the wire into the split in the lawn and tread on it to seal it back in place. You probably won't see it the next day
Make sure you go a bit deeper at the edges of the lawn to protect it from lawn edgers.
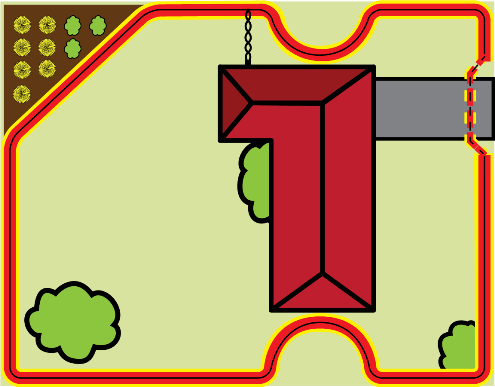
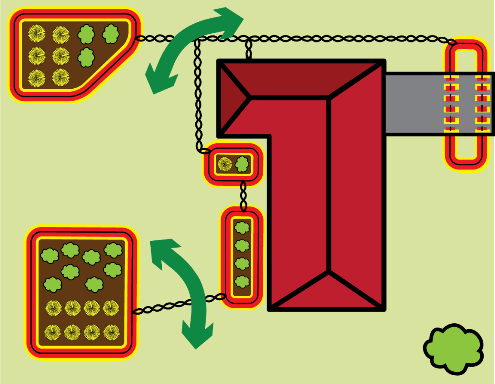
How to keep my dog off the Gardens
You can also isolate internal garden beds to stop dogs digging holes or destroying the retic.
- Place the boundary wire on top of the garden bed and cover with mulch.
- OR bury the wire deep enough so that normal gardening will not cause any damage to the wire.
The wire can be moved or bent to follow the contour of the garden bed. The wire can be laid 1-2 Mtr inside the garden to project the signal outwards and allow your dog to walk to the edge of the garden.
Insert property layout plan for gardens and gates… link it to the garden bed wire layout.
meta / alt tag - how-do-i-stop-my-dog-digging-in-the-garden
Insert the image for the Double loop. - ‘how-do-keep-my-dog-away-from-the-fence
How the Invisible Fence Works - Putting it all together.
Turn it on and Set the Radio Signal Boundary Distance
Once you have the wire connected and forming a continuous loop turn the transmitter on at the powerpoint. The radio signal will project out from the wire as you adjust the range control - see above.
If the transmitter is beeping there is a broken wire.
Walk towards the wire with the receiver collar held in your hand about dog neck height.
When the receiver collar reaches the radio signal an audible warning ‘beep’ will be heard in the warning zone. (approx the first 10% of the radio signal)
Proceed past the warning zone... The beep will change tone.
You can also attach the multitool test Light to see the globe flashing as the correction is actiivating.
Making adjustments
You can adjust the depth of the radio signal (similar to adjusting the volume on a radio). Insert a small flat screw driver in to the ‘range’ control located on the side of transmitter. See diagram step 2.
Advice on the depth/distance of the radio signal.
Do not have the transmitter turned to full ‘volume’ or exceeding what is required. Turn the range control back a tad to take the pressure off
Decide where you would like the collar to commence reacting to the signal this is where the dog will first hear the warning tones.
Have the receiver collar held at that point (at approx the same height as the dog’s neck level).
Slowly turn the range control on the transmitter ‘up’ until the radio signal reaches the receiver collar and the receiver collar reacts.
On a large property using 400 – 500 mtr of wire the signal depth may be around 2-2.5 Mtr. This may vary on different properties.
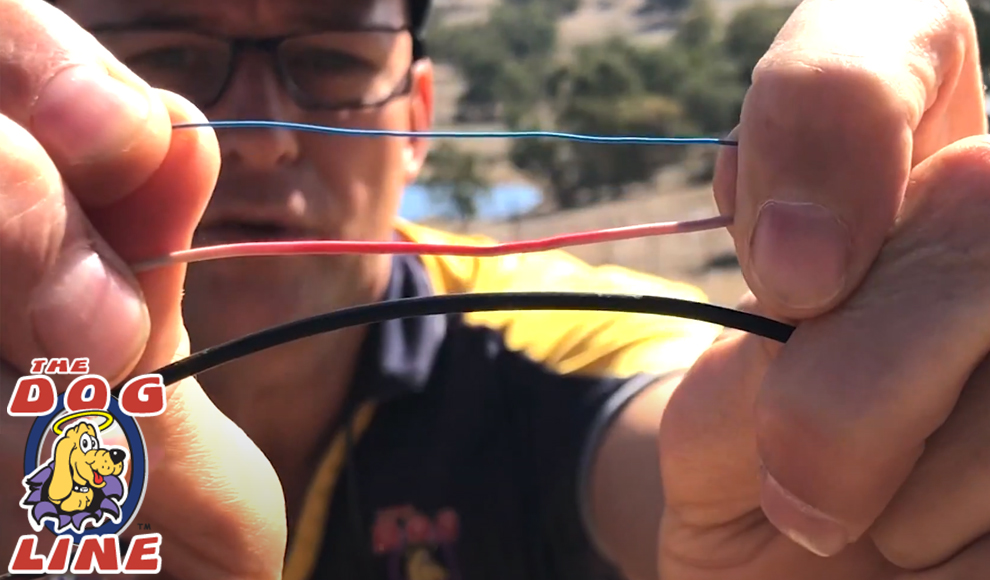
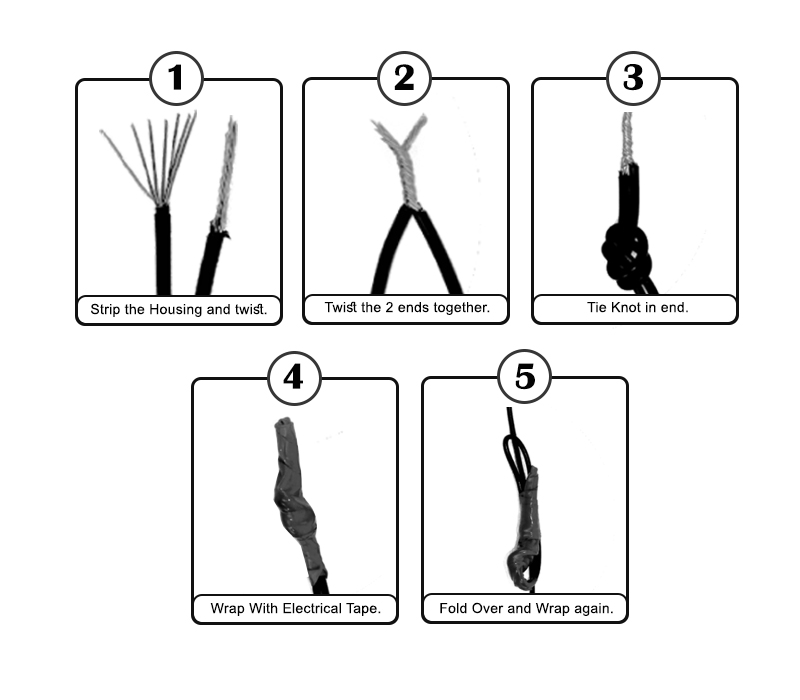
Joining Dog Fence Wires
-
Strip the wire coating to expose the copper core
-
Twist the ends together to create the join - ‘butterfly twist’
-
Tie a knot close to the twist to secure the join
-
Wrap with electrical tape for added protection of the join
-
Fold it over a couple of times to create some spare slack
-
Leave extra slack around the property for joins if you get a break in the wire
Note: Just an extra tip, You can put the wire inside some PVC pipe to protect it from Lawn Trimmers.
If you are still having a hard time about your dog fence wire or you have questions or inquiries about electric dog fences give us a call on our 7 Day Hotline 1-300-(THE-DOG) 1-300-843-364 do not hesitate to CONTACT US
Follow us on FACEBOOK
More About: Bark Control Collars | Electronic Dog Fences | Remote Trainers

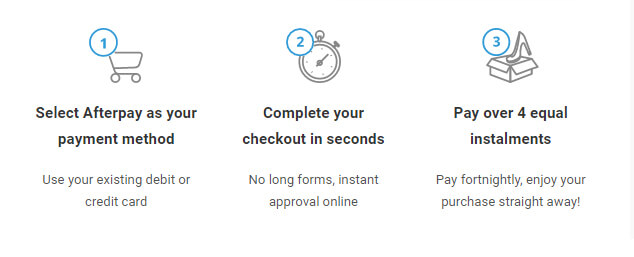
1) An Australian Visa or Mastercard debit/credit card; 2) To be over 18 years of age; 3) To live in Australia
To see Afterpay's complete terms, visit https://www.afterpay.com.au/terms
