The Dogline


SAME DAY SHIPPING!
Hurry offer expires in


COLIN'S REVIEW

"I like the Big Leash remote dog training collar for it's fine tuned and accurate training ability that need a bit of distance. It takes a bit of time to swap from tone to Vibration but the Comm-link, Battery indicator and the FM frequency are a good pay-off. Fast response, Fast charge and lots of levels - Great."

COLIN'S REVIEW
"I like the Big Leash remote dog training collar for it's fine tuned and accurate training ability that need a bit of distance. It takes a bit of time to swap from tone to Vibration but the Comm-link, Battery indicator and the FM frequency are a good pay-off. Fast response, Fast charge and lots of levels - Great."
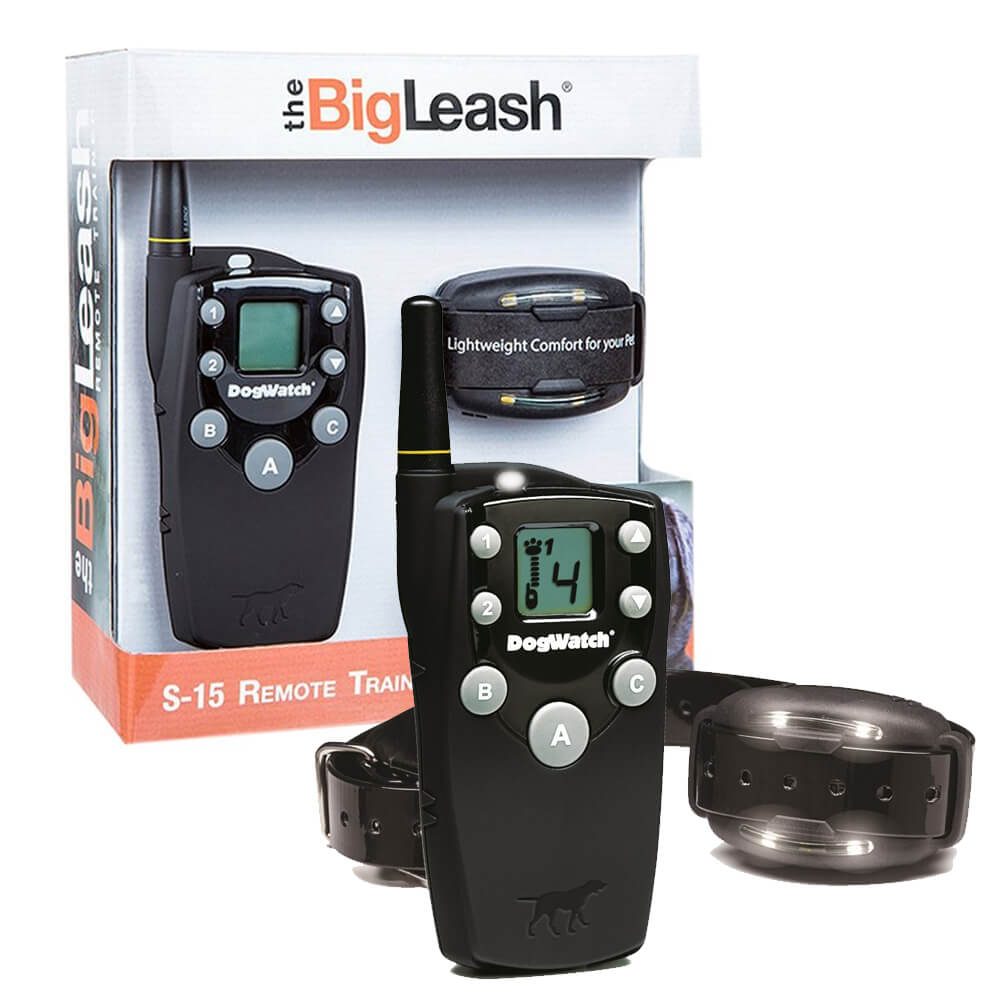
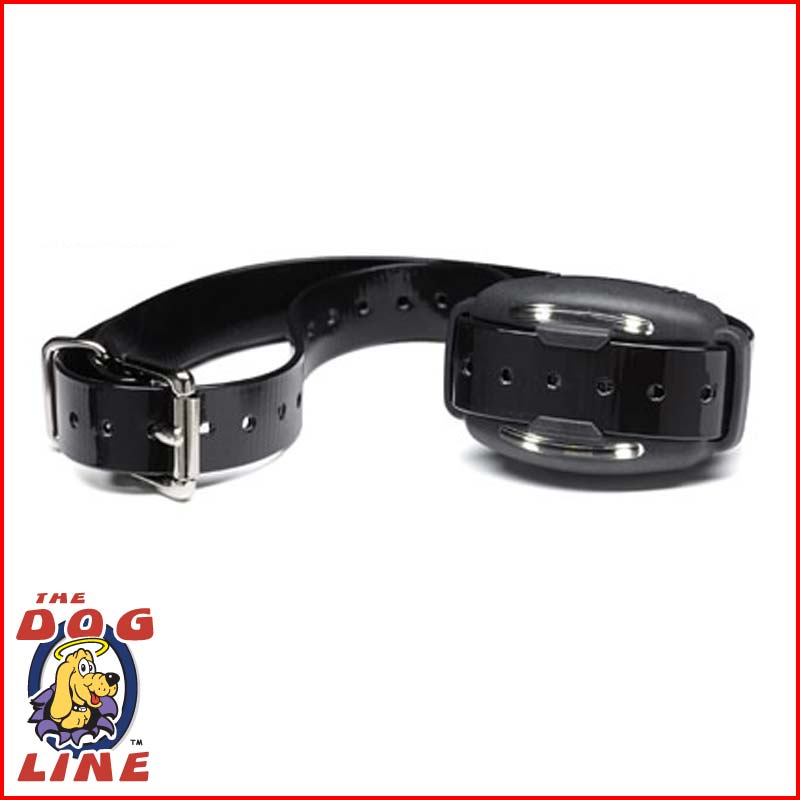
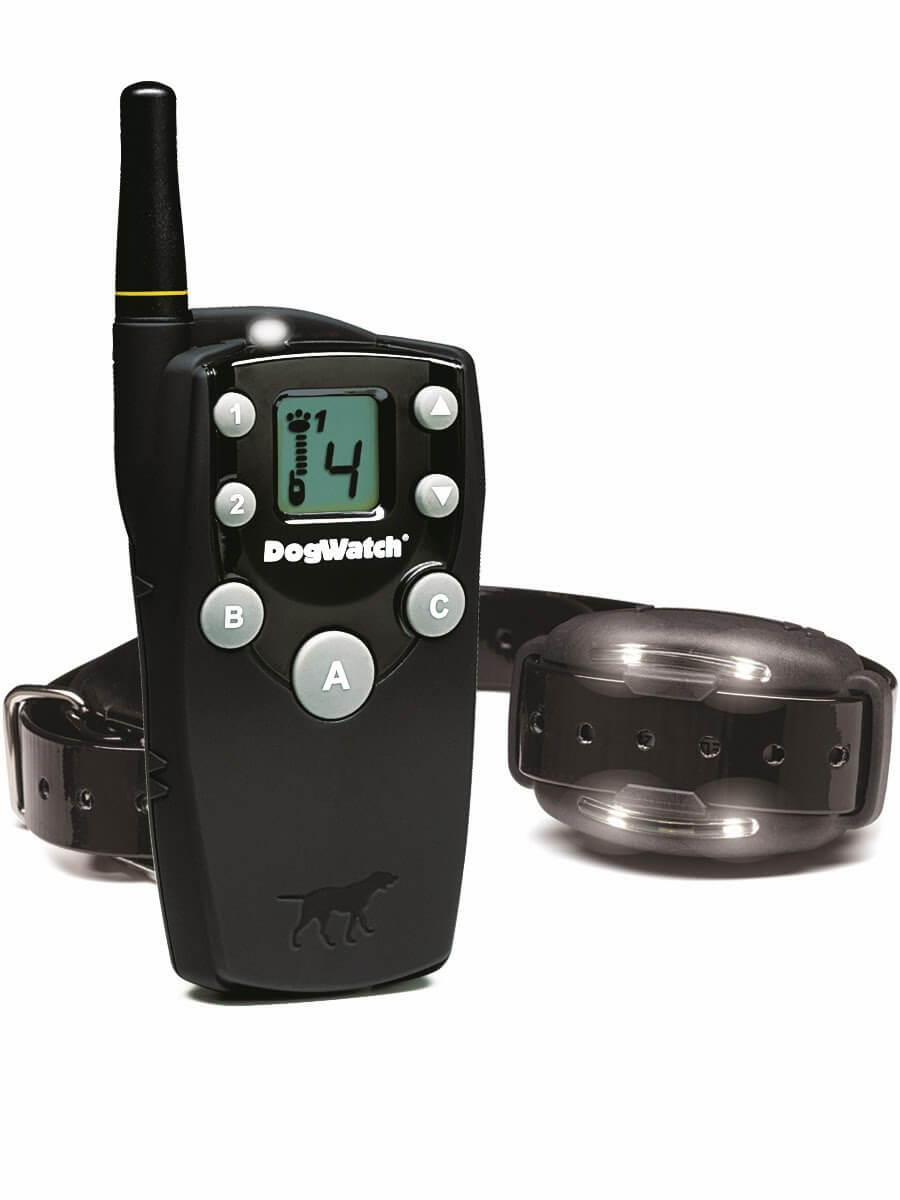
BigLeash FireFly Dog Training Collar


Perfect for a mid-range training session with a working dog, the BigLeash FireFly Remote Trainer allows you to train your dog in the field for up to 800m in the dark! The waterproof BigLeash Receiver Collar is equipped with FireFly light strips that will allow you to see your dog when training at night.
The kit features 15 different stimulation levels which can be used for 4 different stimulation modes including vibration, tone, nick and continuous options. The flexibility and the number of options you have on this kit will enable you to easily train up to 2 dogs simultaneously and easily with the help of the comprehensive LCD Display on the remote transmitter. Both the collar and transmitter are fully rechargeable so you don’t need extra batteries every week or so.
What’s GREAT about the Remote Trainer?
FEATURES
- 2 Year Manufacturer’s Warranty
- Fully Waterproof Receiver Collar
- FireFly® Nightlights to see your dog at night
- Up to 800m in Signal Range
- 15 Static Stimulation Levels
- Vibration and Tone Only Options
- 4 Correction Modes
- Up to 2 Dogs Simultaneously
- Soft-Touch™ Coated Remote Transmitter
- In-Touch™ Two-Way Communication
- Comprehensive LCD Display
- Rechargeable Receiver Collar and Remote Transmitters
WHAT'S IN THE KIT?
- BigLeash Remote Transmitter
- BigLeash FireFly Receiver Collar
- Charger Kit
- Contact Posts to suit your dog
- Owner’s Manual
- Step by Step Training Guide
|
Model |
S-15 |
|
Correction Method |
Static |
| Activation Mode |
Remote |
| Correction Levels | 15 Levels - 4 Modes |
| Waterproof | Yes |
| Dog Size | Small to X-Large |
| External Controls |
No |
| Battery | Rechargeable Li-Ion |
| Battery Status Indicator | Yes |

15 LEVELS – VIBRATION – TONE ONLY – SNICK – CONTINUOUS
With the BigLeash FireFly Dog Training Collar, you have the flexibility you need for any type of dog. It features 15 total correction levels in 4 different correction modes. Train using Vibration, Tone, Nick/Momentary or Continuous. Perfect for whatever training technique you want to use!
FIREFLY® NIGHTLIGHTS FOR NIGHT TRAINING
With 2 bars of FireFly Nightlights installed, you’ll be able to train during the night and easily see where your dog is. Another essential feature for sheepdogs.
IN-TOUCH™ TWO-WAY COMMUNICATION KNOWS YOUR RANGE
Know when your dog is nearly out of range with the BigLeash FireFly Remote Trainer. The Two-way com-link knows when you’re almost out of range so you can quickly call your dog back.
BIGLEASH REMOTE TRAINER CAN TRAIN UP TO 2 DOGS SIMULTANEOUSLY
If you need to train 2 dogs at the same time, the BigLeash Dog Training Collar is capable of making it happen for you. With the click of a button, you can switch from dog 1 to dog 2 and quickly switch back if needed. (Extra receiver collar sold separately)
WATERPROOF RECEIVER COLLAR FOR TRAINING ON WET FIELDS
The BigLeash FireFly Receiver Collar is completely waterproof while the BigLeash Remote Transmitter is weatherproof. These features are essential when you train on the beach, in the lake or on a wet field.
TRAIN YOUR DOG FOR UP TO 800M AWAY
The BigLeash FireFly Remote Training Collar is perfect for mid-range training for up to 800m.
FULLY RECHARGEABLE BIGLEASH TRANSMITTER AND RECEIVER
Both BigLeash Transmitter and BigLeash FireFly Receiver are rechargeable. You won’t worry about forgetting to get new batteries anymore.

CHARGING THE TRANSMITTER AND RECEIVER COLLAR
Charge the transmitter and the receiver collar before use. Initial charging or charging the battery in full prior to first use will extend the life span of batteries.
- The batteries take approximately 3-4 hours to charge.
- Charge your transmitter and receiver when not in use. The device comes with a feature that prevents overcharging.
BATTERY STATUS INDICATORS
Transmitter screen: Battery icon
- Charged battery: No battery icon.
- Low battery: Battery icon comes on and flashes.
- Charging: Battery icon stays on in a steady state.
- Charging complete: No battery icon.
When the battery is plugged:
- The LCD screen stays lighted.
- The transmitter and receiver will not turn on if it is being charged.
BATTERY STATUS LIGHT
- Charged battery: Light flashes green (unplugged, turned on.)
- Low battery: Light flashes red (unplugged, turned on.)
- Charging: Light turns steady red (plugged-in.)
- Charging complete: Light turns steady green (plugged in.)
Using a battery charger other than the one provided may damage your battery and may invalidate your Warranty.
TURNING THE TRANSMITTER AND RECEIVER ON AND OFF
To be able to operate the device; both the transmitter and receiver must be turned on. To turn the device on/off, hold the transmitter and receiver together so the markers on the transmitter and receiver are aligned.
- When the transmitter and receiver collar is turned on, you hear an ascending “beep” tone and the LCD screen turns on too.
- Simply follow the same procedure to turn off the receiver and transmitter. You will also hear a descending “beep” tone and the screen will shut off. You may turn off your system when not in use to help preserve battery life.
USING THE TEST LIGHT TO CONFIRM THE SYSTEM IS WORKING PROPERLY
A Test Light is included in your BigLeash system. This test light is used to literally “test” if the device is working. The light will turn on if it is working.
- Turn the transmitter and receiver collar on. Insert in the test light the contact posts on the receiver collar and hold firmly.
- Press the “B” or the “C” button on the transmitter while holding the test light. The light on the testing device should turn on as you press the button.
- Higher training levels give off brighter lights; lower levels; lower light.
- If the training level is set at its lowest, the light should be barely visible.
- There should be no light on at level 0 (zero)
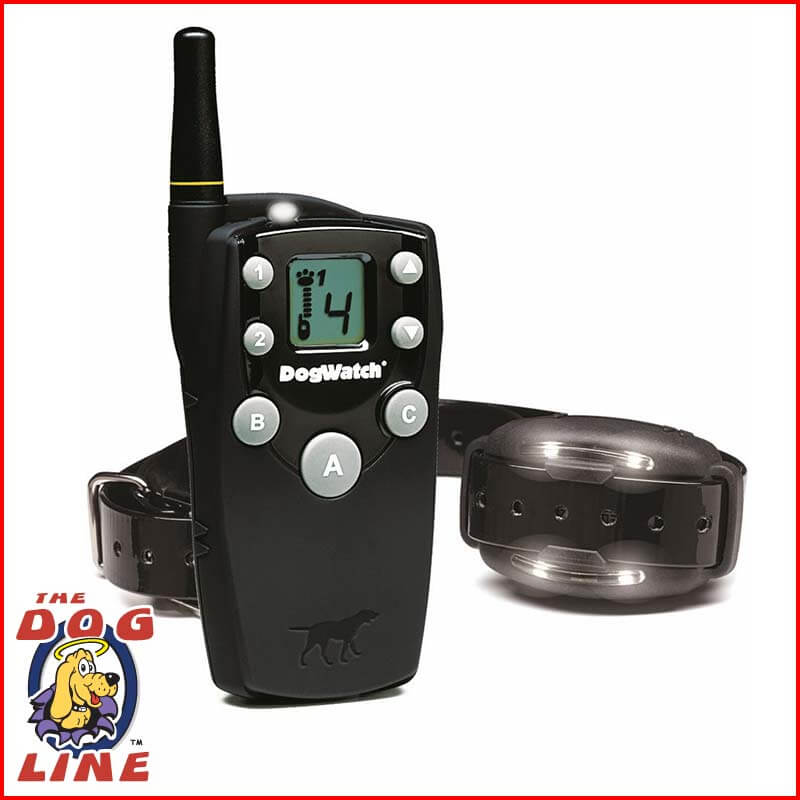
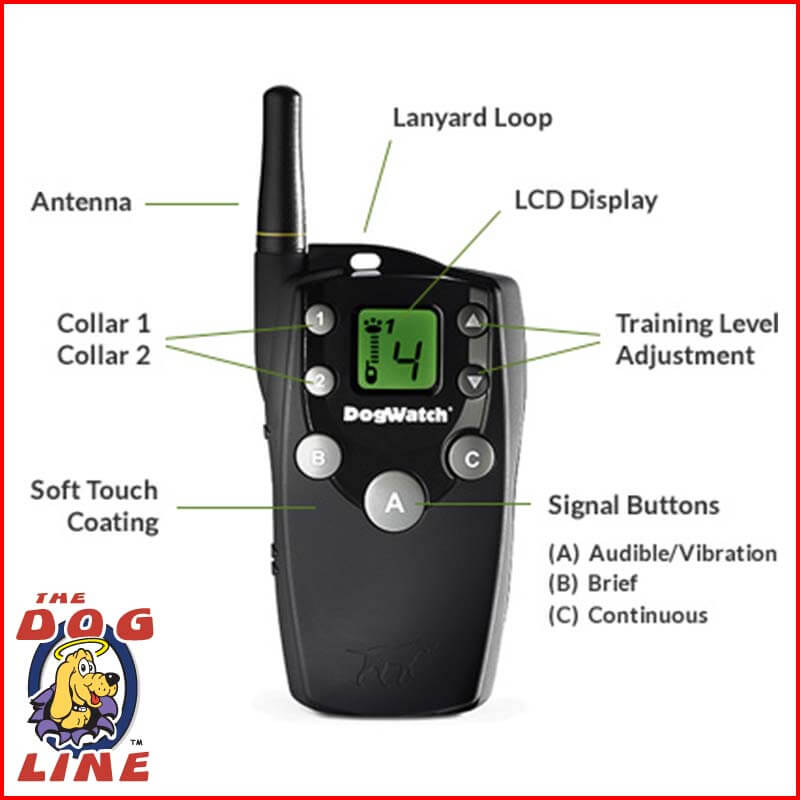
TRANSMITTER FEATURES
BigLeash® uses an exclusive digital FM technology that utilizes a two-way communication between the transmitter and the receiver collar.
1. Lanyard Loop
A lanyard or cord is provided so its easier to carry the transmitter by wearing it around the neck, shoulder, or wrist. A lanyard is provided to ensure that the transmitter is visible at all times and losing it can be avoided.
2. Antenna/Range Information
Your BigLeash Remote Trainer provides up to 1/4 mile range at its best setup. The area of coverage will vary depending on environmental factors such as terrain, weather, vegetation, buildings and other obstructions within the training range.
How you hold the transmitter also affects the coverage. For maximum coverage, keep the antenna pointed up towards the sky.
Pointing the transmitter antenna towards your pet or elsewhere will reduce the area of coverage. Also, keep your fingers off the antenna.
Touching the antenna or keeping your hands on the antenna during transmission will cause an obstruction and therefore reduce the efficiency and the range of the signal.
3. Training Levels
Use the UP and DOWN buttons to the right of the LCD screen to adjust the training level.
Always start at the lowest level or level 1 and gradually increase the training level until you notice a reaction from your dog. Reactions vary; the simplest reaction such as a quick head shakes, looking down, even flicking an ear is a sign.
Keep yourself focused on your dog while training. As soon as you see a reaction, that is the start of the level that you should start the training with.
The right level differs from dog to dog. The first sign of the dog’s reaction should be the basis of the starting level
We recommend starting off with the lowest training level where you got a reaction from your dog.
0 (zero) = Safety Mode (no training signal, no audible, no vibration)
4. LCD Display
- Collar 1/Collar 2 Icon
The collar icon tells you which one is receiving the signal when working with 2 dogs.
- Receiver Icon (Paw)
This icon indicates that the receiver collar is ‘on’ and functioning properly.
Paw icon blinks if the signal is lost (example if the dog is out of range or collar battery is depleted.)
- Transmitter Icon
It indicates that the transmitter is ‘on’ and functioning properly. Transmitter icon blinks when activated. It is activated by pressing a button on the remote.
- Signal Strength
The signal is indicated by the lines between the transmitter and the paw icons.
- Battery Icon
No icon = Charged
Icon = Low Battery
- Training Level
|
0 |
No Signal |
|
1-5 |
Mild |
|
6-10 |
Moderate |
|
11-15 |
Strong |
Example 1: Strong signal, training level 3, collar 1, and low transmitter battery.
Example 2: Weak signal, training level 3, collar 2, and good battery.
A weak signal usually indicates the dog is moving out of range of the transmitter.
1. Collar 1 / Collar 2 Feature
Your transmitter comes as a set for use with one dog but it can easily be programmed to accommodate two dogs.
- If you are working with two dogs, you will need two receiver collars as well. See page 24 for information about adding a second collar.
- The Collar 1 and Collar 2 buttons allow you to change commands between the two collars. The transmitter saves the settings for each collar so and the settings automatically change when you switch from Collar 1 to Collar 2.
- The LCD screen indicates if the transmitter is set to Collar 1 or Collar 2.
2. Training Buttons
Button A [Audible / Vibration]
- The ‘A’ button sends either an audible warning or a vibration warning to the dog’s receiver collar. The warning continues as long as you press the button (for a maximum of up to 8 seconds.)
Button B [Brief]
- Pressing the ‘B’ button sends a single brief correction (~1 second).
Button C [Continuous]
- Pressing the “C’ button sends a continuous correction for as long as you hold the button down. If the button is not released, the correction will automatically stop after 8 seconds. This is to prevent over correction.
To send additional training signals, simply press the button again. Only one signal can be transmitted at one time.
SWITCHING FROM AUDIBLE TO VIBRATION MODE
With the BigLeash, you have the option of using the “A” Button for either an Audible warning or a Vibration warning. You have the option to choose your mode of preference.
When working with 2 dogs, the two collars work independently, meaning they work under different settings of your choice.
To Switch Between Audible and Vibration:
- Turn the transmitter and the receiver collar “on”. Set to Collar 1 or Collar 2.
- Set training level to “0”.
- Hold the “A” button with the training level at “0”.
Continue holding the “A” button until about 5 seconds and then the transmitter will begin to toggle between Audible (A) and Vibration (V). The mode will display on the LCD screen.
- To set to Audible, release the “A” button while the “A” is displayed.
- To set to Vibration, release the “A” button while the“V” is displayed.
- To test the setting, reset transmitter to any training level (1-15) and press the “A” button.*
- The “A” button will remain set to either Audible mode or Vibration mode until you change settings. Collar 1 and Collar 2 are set and changed independently.
Audible and vibration intensity is always the same regardless of the training level setting, except when setting to “0” (no signal).
RECEIVER COLLAR FEATURES
The BigLeash has a battery status light and the Firefly® nightlight to help you keep track of your dog at night.
Battery Status Light
|
Blinks GREEN |
Turned on, charged |
|
Blinks RED |
Turned on, low battery |
|
Steady RED |
Plugged-in, charging |
|
Steady GREEN |
Plugged-in, fully charged |
Turn “on” the receiver collar by holding the Receiver collar and the Transmitter next to each other with the Markers aligned.
Firefly Nightlight
- To activate the Firefly light strips on Collar 1, press the Collar 1 button on the Transmitter.
- To activate the Firefly light strips on Collar 2, press the Collar 2 button on the Transmitter.
- Press the Collar 1 or Collar 2 button briefly, the light strip blinks briefly.
- Press the Collar 1 or Collar 2 button for 5 seconds, the light stays on and continues to blink. To turn “off”, press button again for 5 seconds until the light stops blinking.
- When switching between Collar 1 and Collar 2, the light strip will blink briefly on the collar which is receiving the signal from the transmitter.
The BigLeash receiver is waterproof and should withstand any type of weather.
USING THE REMOTE TRAINER
Appropriate and Proper Use
Using this device properly and appropriately directly affects the success of the training. The remote trainer should be used to train your dog in avoiding unwanted behavior and in reinforcing good behavior.
Choosing the Contact Posts
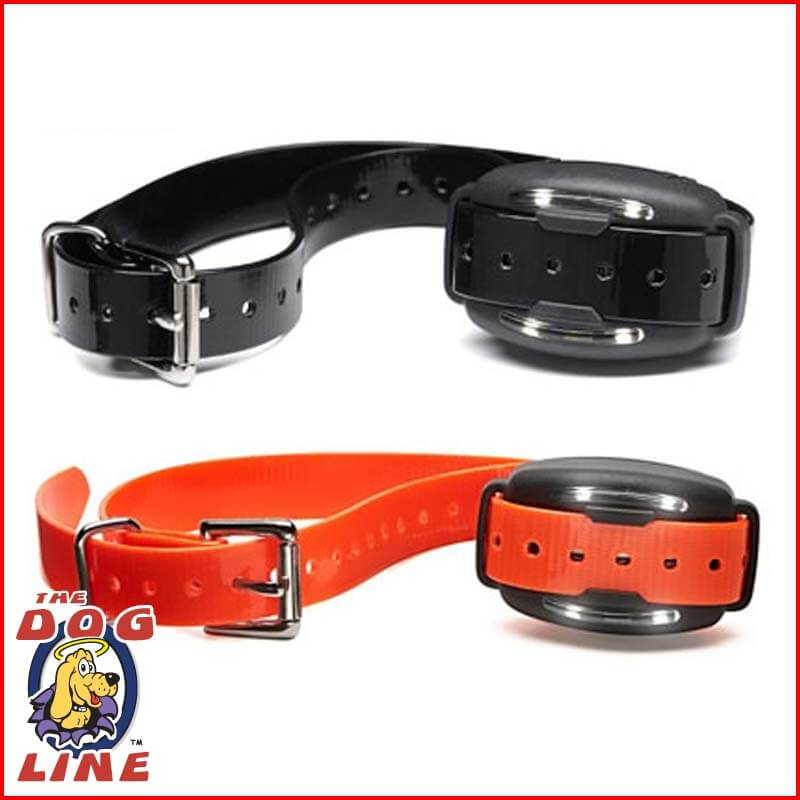
There are two sets of contact posts. The short contact posts on the receiver will work for most dogs however there is an extra set of long contact posts that works for dogs with thick coats.
The correct fit depends on the dog’s size, neck shape, coat, and skin sensitivity. The posts must get consistent contact with the skin for the dog to feel the correction. For dogs with very thick coats, longer contact posts may be needed or trimming some hair around the contact posts may help ensure proper contact.
Fitting the Receiver Collar
- Before you start training, make sure the receiver collar has the right fit.
You should be able to put your thumb between the contact posts and the dog’s neck.
Fit should be snug. To check if the fit is snug, let the dog face down or do the sniffing position and then insert your thumb between the contact posts and the dog’s neck.
- It is VERY IMPORTANT that there should be a perfect snug fit. If the collar is too loose, your dog may not receive the signal at all.
Note: The receiver collar is not to be worn for extended periods. Remove the collar when not in use so you can avoid skin irritations due to prolonged use.
TYPES OF TRAINING SIGNALS
The BigLeash trainer allows you to adjust the type, the duration and the level of the training signal according to your preference
- The “A” button provides either an audible or a vibration warning. The warning continues (up to 8 seconds) while you press the “A” button.
- The “B” button provides a brief 1 second correction (regardless of how long you hold the button down.) Press the “B” button repeatedly for a series of brief corrections.
- The “C” button provides a continuous correction (up to 8 seconds.) This allows you to give extended correction when the situation calls for it.
The type of training signal you select should depend both on the behavior you want to reinforce and the way your dog responds to the correction. The goal here is for your dog to learn that the correction can be avoided by responding appropriately.
- During the early stages of training, most dogs quickly respond to the first or second brief correction (button ‘B’). However, some dogs may need more brief corrections (or a higher training level), it really depends on the dog’s personality and level of stimulus that excites of distracts the dog.
- It is recommended that a short audible or vibration warning come before giving brief or continuous corrections. This gives your pet a “warning” so could heed before getting a higher correction.
- For very untoward behaviors, such as chasing or barking – a number of continuous corrections (button ‘C’) may be needed.
Picking the Right Training Level
There are 15 training levels to choose from. The training level really depends on your dog’s reaction. You can customize your remote trainer according to your dog’s temperament and the type of command you are trying to teach.
Each dog has different cognitive levels; some dogs will respond to low training levels; while others may need the higher ones.
Start with the lowest level
Before you start training; you need to test the dog’s response first. Starting at Level 1, use the Brief (B) button and watch for a response that should indicate a discomfort (it could be a quick tug on a leash). The goal here is to get the dog's attention without creating anxiety.
CREATING THE RIGHT ENVIRONMENT
- Always keep the training “positive”. You can make use of praises and other gestures that will reinforce positive behavior.
- Use a high happy tone when praising. Use a low and deeper tone for negative commands. If the dog seems to be very eager and energetic; keep them focused by using a calm and soothing tone; once they are focused; you can praise with enthusiasm.
- A dog’s response may change depending on the excitement or distraction he is subjected to. Remember to keep the dog’s attention on the training activity so you can get a pattern of behavior.
- Always give time for free play while giving your dog praises before or after training.
- If your dog does not seem to respond at Level 1, you can increase the training level one level at a time until you get a response from him. You may need to adjust levels while training as dogs have different reactions/responses to a situation.
DOG'S RESPONSE TO TRAINING
Dogs respond differently. Different dogs have different reactions when they feel a correction. Some dogs respond in subtle ways while others respond otherwise.
Of course; at first, your dog will not automatically understand what to do when he receives a signal from the remote trainer. You need to give him time to be acquainted with the training process. On the other hand; you need to really understand how the remote trainer works for you to effectively facilitate it.
TRAINING BASICS
Your remote trainer can be used in two ways:
1. It can be used to reinforce appropriate behaviors such as obedience commands as “Come”, “Sit”, and “Stay.”
2. It can also be used to correct inappropriate behaviors such as jumping, digging and excessive barking.
CONSISTENCY AND TIMING
- Consistency is vital for successful training. While you are training your dog; you will realize how being firm in your training will yield good results. If you correct your dog for one behavior such as trash raiding; you should correct him each time he does the act. Do not allow bad behavior on certain occasions. Make your dog realize that bad behavior will always be corrected.
- The training signal must be delivered in a timely manner. That means; if your dog does a bad behavior; he should be corrected right then and there; this is for him to realize and associate that bad behavior with the correction. Delaying the correction will cause confusion on the dog and will cause him to associate the correction with something else. So, always send the correction as the dog is doing the bad behavior.
PLAN YOUR TRAINING FOR SUCCESS
During the early phase of training, it is advised that you conduct training sessions in an open area free that is free from distractions. If the area has no fence, you need to use a long rope to keep him from leaving the area until the training session is finished.
Once your dog has learned the commands with the first setting, you can now gradually increase distractions and continue with the training so the dog gets used to training in all kinds of situations. This process is done to train the dog to continue to associate the training signal with the behavior and not with the distractions.
During the early stages of training, just limit sessions for 15-20 minutes. Just repeat the sessions regularly and frequently. Dogs easily learn by repetition and reinforcement.
Do not make it obvious to your dog that you are controlling the remote transmitter and sending signals to his collar. The dog needs to associate his behavior with the sensation of the training signal - - not to you or to the remote trainer!
TRAINING METHODS
There are many different training approaches that you can use with your dog. With a remote trainer, some professional trainers would recommend that you give an initial verbal warning before proceeding with the training correction. Some trainers would also proceed with the correction immediately as they believe that it is more effective. You can try either one; but again; it’s always best to try with the lowest level first; in this case, it is the verbal warning. Try to see whichever works best with your dog. Just remember that the key is to be consistent.
- For obedience training, do your verbal command along with the correction. So the two go together for a quicker response.
- Begin this type of training by pressing the Continuous button (‘C’). Your dog should understand that the correction stops when he responds appropriately to the command. Once he feels the correction, he will respond more quickly. You should also begin to shorten the type and duration of the correction if you see that the dog responds quickly.
- When your dog responds almost immediately to your command, you can reduce the use of the trainer or can use it only when you need to repeat teaching the command. Once the dog is fully trained and is already quick to respond, a quick vibration or audible warning may be all that you need.
BASICS IN BEHAVIOR TRAINING
After your dog has understood the basic obedience commands, it’s time to level up to more specific behavior training. All of the general and obedience training basics are prerequisites to other behavior training.
GENERAL AVOIDANCE TRAINING
- “Avoidance” training is teaching your dog to associate the correction with the behavior. This will help him learn that in order to stop feeling the correction; he must stop the behavior. Now, he learns to “avoid” the behavior.
- The use of verbal commands and/or audible/vibration alerts varies depending on the situation and the training method. There are certain acts such as digging or jumping up that you may want your dog to associate with the training correction and no verbal command or audible/vibration warning. There are also other situations such as general obedience that a verbal command and/or audible/vibration warning is necessary before giving the correction.
- When training your dog’s behavior, you have to remember that not all activities should be eliminated completely. A good example of this behavior is barking. Though some barking needs to be eliminated; you can never completely eliminate it in your dog since it is an innate ability of the dog and it is his way of communicating with others. The goal of your training should be to control problematic behavior and not to eliminate normal dog activities.
- A dog will not automatically understand what to do in the first few instances that he receives a signal from the remote trainer. It needs some time to get used to the correction and to take action in response to that correction as well.
- Don’t comfort your dog after giving a correction. This will confuse your dog if what he did was right or wrong. Be firm in disciplining your dog. What is wrong is wrong, and wrong should be corrected.
This Owner’s Guide provides general training examples for common dog behaviors. You may also seek advice from a trainer who is experienced in remote trainers.
GENERAL EXAMPLES OF BEHAVIOR TRAINING
The following examples offer the general approach of the remote trainer in addressing specific behavioral problems. Again, consistency and timing are of the essence.
Barking
- Barking is a natural part of dog behavior. Barking to dogs is what talking is to humans; it is their way of communication. Therefore dogs should be allowed to bark like a normal part of their everyday lives. You can control excessive barking but you should not eliminate the “normal” barking.
- If barking becomes excessive, use a “quiet” or “no barking” verbal cue and then back it up with a training signal from your remote trainer.
Digging
- Dogs dig for many different reasons. They may dig because they are looking for a cool place to lie down, or they may have seen an insect on the ground or they may be simply bored.
- If you need to stop a dog from digging certain areas; send a training signal the moment he starts to dig.
Chasing
- The most common chase object for dogs is cars.
- Extra care must be taken when teaching your dog not to chase cars. The dog should be away from the car when you send a training signal.
- In most cases; dogs feel distracted by something so they chase it excites them. Use of the Continuous signal (C button) and increased training level may be necessary, especially in the early stages of training your dog to stop chasing.
Jumping
- Dogs usually jump up to get other’s attention.
- When your dog is attempting to jump, command him to “sit”; once he sits; praise him and give him the attention he is seeking.
- If the remote trainer is to be used to stop dog from jumping on people, use the Brief (B) button to send a training correction whenever he jumps. Do not praise the dog when he gets off.
- Use the same approach to stop dog from jumping up to steal food from the counter or the table. If your dog usually jumps up the table when no one is around, then you may need to leave food on the counter or the table, go somewhere you can see the dog (the should not see you). Once you see the dog jump; send him the correction.
- Everybody should cooperate in this training. Family members, friends should help maintain consistency especially in stopping the dog from jumping.
Jumping on Furniture
- You can train your dog to stay off from ALL furniture, or you can train him to stay off from certain or specific furniture only. Send him a correction each time he jumps on "off-limit furniture” Any furniture that is ‘off limits’ should ALWAYS be ‘off-limits.’ Again; exercise consistency.
- Send a training signal the moment your dog starts to jump up the “off-limit” furniture. Time is of the essence of sending the correcton. Correction should be felt at the exact moment he is doing the act.
- Your dog should associate the correction with the “off-limit” furniture. Once he learns this association; he will avoid that furniture in the future.
- You can also do “conditional” training on your dog with regards to jumping on furniture. An example of this is jumping on the table. You can sometimes invite your dog to go up the table only when you ask him to; and when he does go up; he will not get corrected, instead he gets praise from you. However; if he jumps up the table without invitation he will receive the training signal. You can use a lower training level for this conditional training. During this training; make sure you do not confuse the dog.
Chewing
- Chewing for dogs is as natural as eating. It is a natural behavior. As with barking, there is acceptable and unacceptable chewing. You must first decide what can be classified as unacceptable and from orient the dog with the behavior and give him a signal each time he does unacceptable chewing.
- You need to teach your dog the things he is allowed to chew (special chew toys, bones, etc.) as well as things he is not allowed to chew (shoes, socks, garden hoses, etc.). The moment the dog starts to chew something not allowed, send the signal right away.
Aggression
- “Aggression” in dogs refers to a wide variety of behaviors that occur for many different reasons depending on the circumstances they are in. Most dogs are aggressive when guarding their territories, defending their offspring and protecting themselves.
- Dogs chase and engage in aggressive behaviors (such as biting and fighting) for a variety of reasons that differ from one dog to another.
- This trainer can be used to control dogs who display acts of aggression. Send the signal each time the dog becomes aggressive. However; do note that this device is not intended to change the behavior of AGGRESSIVE DOGS or dogs that are innately aggressive even for no apparent reason. It can only be used for dogs who are not aggressive but every once in awhile become aggressive due to outside factors.
WARNING: This product is not designed for use with dogs that have a history of aggressive behavior. Consult a qualified professional who has experience working with aggressive dogs before using this product.
TROUBLESHOOTING
The Remote Trainer Is not Working
- Check batteries. Batteries in the transmitter and the receiver should be charged.
- Check if the device is ON. Both the transmitter and receiver should be turned “on”.
- If batteries are fully charged but do not turn ON, press the “A” button on the transmitter and check the LCD screen. Wait for the transmitter icon display then follow the reprogramming instructions on page 24. If the icon does not display and reprogramming does not work, call Customer Service.
Dog Does Not Seem To Respond
- Check if the collar is a snug fit. The ends of the contact posts should touch the dog’s neck.
- Check the training level. If the level is set to “0” (safety mode), then there will be no signal sent to the receiver. If it is set on low, try to increase by one level at a time. See Training Level instructions on page 6.
- If the transmitter is programmed for use with 2 dogs, check if it is set to the correct collar.
The Transmitter Range Is Reduced
- The range is affected by environmental factors such as ground terrain, weather, buildings, and other obstructions.
- For optimum range; hold the transmitter with the antenna pointed toward the sky, not towards the dog.
- Keep your fingers away from the antenna. Touching the antenna will greatly reduce the range.
The Battery Does Not Seem To Charge
- Be sure the plugs are inserted properly.
- Use only the battery charger provided with your trainer.
- If the battery is not charging as long as it used to, it may be time to replace the battery.
No Communication Link
- The link can usually be restored by turning the system on/off or by charging the transmitter and receiver.
- Transmitters and receivers may need to be reprogrammed to recognize each other.
Cold Weather Performance
- All batteries are prone to drop in voltage cold weather. Batteries also use up faster during cold weather.
- The dog may feel that the signals are not as strong during cold weather.
- During cold months, it is best to keep your device fully charged. The device is in its optimum performance at room temperature.
Programming the Receiver Collar
Adding a Second Collar
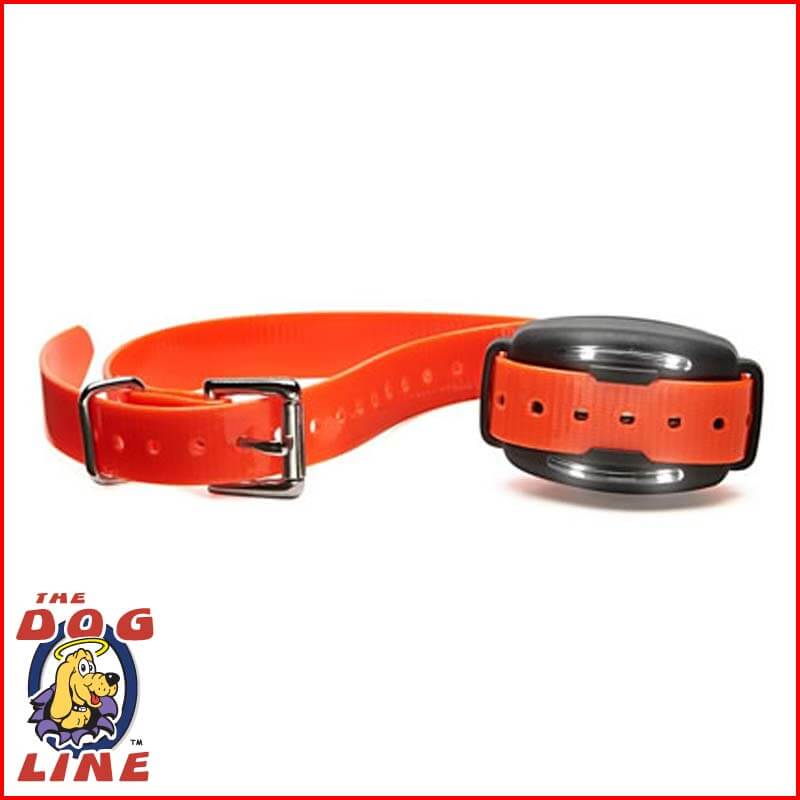
Your transmitter has been set for use with one dog but it can easily be programmed for use with two dogs. The Collar 2 has a bright orange collar strap and has a small “Dog 2” sticker on the back for easy identification.
- Before you add the second Collar to the transmitter, make sure it has been charged for at least 3 hours.
- Turn off the transmitter and the two receiver collars.
- Hold down the ‘A’ button for 10 seconds until the screen on the transmitter turns ‘on’.
- Set the TRAINING LEVEL to ‘2’.
- Press and hold down the Collar 2 button while turning the new receiver ‘on’ by aligning the receiver next to the transmitter at the alignment markers.
- Continue to hold the receiver next to the transmitter at the alignment markers while holding down the Collar 2 button.
- You will hear a series of beeps. When the series of beeps stop, you can move the receiver away from the transmitter.
- The second receiver is now programmed to the Collar 2 setting.
- Turn on the transmitter and receiver.
Re-Programming Collar 1 to the Transmitter
Follow the same steps as Adding a Second Collar, except for the following:
- Set the training level to ‘1’ (step 4).
- Hold down the ‘A’ button instead of the collar 2 button (step 5).
Accessories


Similar


Price Match
We'll Beat any Aussie Competitor's Price!
Here at The Dog Line, we guarantee that our prices either match the prices of competitor’s or beat them. We also offer a lot of other Reasons to Buy besides a price match guarantee.

If you see an Australian competitor having lower prices than us, simply fill in the form below with all the details and we’ll beat their price! On top of that, we will give you an *exclusive 10% discount of the difference.
| Sample | Calculation | |
| Our Price | = | $130 |
| Other Price | = | $80 |
| Difference | = | $50 |
| Discount | 10% of $50 = | $5 |
| Final Price for You | = | $75 |
Fill in the form below and we'll contact you for the price match.
Product Review
BigLeash FireFly Dog Training Collar
Perfect for a mid-range training session with a working dog, the BigLeash FireFly Remote Trainer allows you to train your dog in the field for up to 800m in the dark! The waterproof BigLeash Receiver Collar is equipped with FireFly light strips that will allow you to see your dog when training at night.
The kit features 15 different stimulation levels which can be used for 4 different stimulation modes including vibration, tone, nick and continuous options. The flexibility and the number of options you have on this kit will enable you to easily train up to 2 dogs simultaneously and easily with the help of the comprehensive LCD Display on the remote transmitter. Both the collar and transmitter are fully rechargeable so you don’t need extra batteries every week or so.
What’s GREAT about the Remote Trainer?
FEATURES
- 2 Year Manufacturer’s Warranty
- Fully Waterproof Receiver Collar
- FireFly® Nightlights to see your dog at night
- Up to 800m in Signal Range
- 15 Static Stimulation Levels
- Vibration and Tone Only Options
- 4 Correction Modes
- Up to 2 Dogs Simultaneously
- Soft-Touch™ Coated Remote Transmitter
- In-Touch™ Two-Way Communication
- Comprehensive LCD Display
- Rechargeable Receiver Collar and Remote Transmitters
WHAT'S IN THE KIT?
- BigLeash Remote Transmitter
- BigLeash FireFly Receiver Collar
- Charger Kit
- Contact Posts to suit your dog
- Owner’s Manual
- Step by Step Training Guide
|
Model |
S-15 |
|
Correction Method |
Static |
| Activation Mode |
Remote |
| Correction Levels | 15 Levels - 4 Modes |
| Waterproof | Yes |
| Dog Size | Small to X-Large |
| External Controls |
No |
| Battery | Rechargeable Li-Ion |
| Battery Status Indicator | Yes |
15 LEVELS – VIBRATION – TONE ONLY – SNICK – CONTINUOUS
With the BigLeash FireFly Dog Training Collar, you have the flexibility you need for any type of dog. It features 15 total correction levels in 4 different correction modes. Train using Vibration, Tone, Nick/Momentary or Continuous. Perfect for whatever training technique you want to use!
FIREFLY® NIGHTLIGHTS FOR NIGHT TRAINING
With 2 bars of FireFly Nightlights installed, you’ll be able to train during the night and easily see where your dog is. Another essential feature for sheepdogs.
IN-TOUCH™ TWO-WAY COMMUNICATION KNOWS YOUR RANGE
Know when your dog is nearly out of range with the BigLeash FireFly Remote Trainer. The Two-way com-link knows when you’re almost out of range so you can quickly call your dog back.
BIGLEASH REMOTE TRAINER CAN TRAIN UP TO 2 DOGS SIMULTANEOUSLY
If you need to train 2 dogs at the same time, the BigLeash Dog Training Collar is capable of making it happen for you. With the click of a button, you can switch from dog 1 to dog 2 and quickly switch back if needed. (Extra receiver collar sold separately)
WATERPROOF RECEIVER COLLAR FOR TRAINING ON WET FIELDS
The BigLeash FireFly Receiver Collar is completely waterproof while the BigLeash Remote Transmitter is weatherproof. These features are essential when you train on the beach, in the lake or on a wet field.
TRAIN YOUR DOG FOR UP TO 800M AWAY
The BigLeash FireFly Remote Training Collar is perfect for mid-range training for up to 800m.
FULLY RECHARGEABLE BIGLEASH TRANSMITTER AND RECEIVER
Both BigLeash Transmitter and BigLeash FireFly Receiver are rechargeable. You won’t worry about forgetting to get new batteries anymore.
CHARGING THE TRANSMITTER AND RECEIVER COLLAR
Charge the transmitter and the receiver collar before use. Initial charging or charging the battery in full prior to first use will extend the life span of batteries.
- The batteries take approximately 3-4 hours to charge.
- Charge your transmitter and receiver when not in use. The device comes with a feature that prevents overcharging.
BATTERY STATUS INDICATORS
Transmitter screen: Battery icon
- Charged battery: No battery icon.
- Low battery: Battery icon comes on and flashes.
- Charging: Battery icon stays on in a steady state.
- Charging complete: No battery icon.
When the battery is plugged:
- The LCD screen stays lighted.
- The transmitter and receiver will not turn on if it is being charged.
BATTERY STATUS LIGHT
- Charged battery: Light flashes green (unplugged, turned on.)
- Low battery: Light flashes red (unplugged, turned on.)
- Charging: Light turns steady red (plugged-in.)
- Charging complete: Light turns steady green (plugged in.)
Using a battery charger other than the one provided may damage your battery and may invalidate your Warranty.
TURNING THE TRANSMITTER AND RECEIVER ON AND OFF
To be able to operate the device; both the transmitter and receiver must be turned on. To turn the device on/off, hold the transmitter and receiver together so the markers on the transmitter and receiver are aligned.
- When the transmitter and receiver collar is turned on, you hear an ascending “beep” tone and the LCD screen turns on too.
- Simply follow the same procedure to turn off the receiver and transmitter. You will also hear a descending “beep” tone and the screen will shut off. You may turn off your system when not in use to help preserve battery life.
USING THE TEST LIGHT TO CONFIRM THE SYSTEM IS WORKING PROPERLY
A Test Light is included in your BigLeash system. This test light is used to literally “test” if the device is working. The light will turn on if it is working.
- Turn the transmitter and receiver collar on. Insert in the test light the contact posts on the receiver collar and hold firmly.
- Press the “B” or the “C” button on the transmitter while holding the test light. The light on the testing device should turn on as you press the button.
- Higher training levels give off brighter lights; lower levels; lower light.
- If the training level is set at its lowest, the light should be barely visible.
- There should be no light on at level 0 (zero)
TRANSMITTER FEATURES
BigLeash® uses an exclusive digital FM technology that utilizes a two-way communication between the transmitter and the receiver collar.
1. Lanyard Loop
A lanyard or cord is provided so its easier to carry the transmitter by wearing it around the neck, shoulder, or wrist. A lanyard is provided to ensure that the transmitter is visible at all times and losing it can be avoided.
2. Antenna/Range Information
Your BigLeash Remote Trainer provides up to 1/4 mile range at its best setup. The area of coverage will vary depending on environmental factors such as terrain, weather, vegetation, buildings and other obstructions within the training range.
How you hold the transmitter also affects the coverage. For maximum coverage, keep the antenna pointed up towards the sky.
Pointing the transmitter antenna towards your pet or elsewhere will reduce the area of coverage. Also, keep your fingers off the antenna.
Touching the antenna or keeping your hands on the antenna during transmission will cause an obstruction and therefore reduce the efficiency and the range of the signal.
3. Training Levels
Use the UP and DOWN buttons to the right of the LCD screen to adjust the training level.
Always start at the lowest level or level 1 and gradually increase the training level until you notice a reaction from your dog. Reactions vary; the simplest reaction such as a quick head shakes, looking down, even flicking an ear is a sign.
Keep yourself focused on your dog while training. As soon as you see a reaction, that is the start of the level that you should start the training with.
The right level differs from dog to dog. The first sign of the dog’s reaction should be the basis of the starting level
We recommend starting off with the lowest training level where you got a reaction from your dog.
0 (zero) = Safety Mode (no training signal, no audible, no vibration)
4. LCD Display
- Collar 1/Collar 2 Icon
The collar icon tells you which one is receiving the signal when working with 2 dogs.
- Receiver Icon (Paw)
This icon indicates that the receiver collar is ‘on’ and functioning properly.
Paw icon blinks if the signal is lost (example if the dog is out of range or collar battery is depleted.)
- Transmitter Icon
It indicates that the transmitter is ‘on’ and functioning properly. Transmitter icon blinks when activated. It is activated by pressing a button on the remote.
- Signal Strength
The signal is indicated by the lines between the transmitter and the paw icons.
- Battery Icon
No icon = Charged
Icon = Low Battery
- Training Level
|
0 |
No Signal |
|
1-5 |
Mild |
|
6-10 |
Moderate |
|
11-15 |
Strong |
Example 1: Strong signal, training level 3, collar 1, and low transmitter battery.
Example 2: Weak signal, training level 3, collar 2, and good battery.
A weak signal usually indicates the dog is moving out of range of the transmitter.
1. Collar 1 / Collar 2 Feature
Your transmitter comes as a set for use with one dog but it can easily be programmed to accommodate two dogs.
- If you are working with two dogs, you will need two receiver collars as well. See page 24 for information about adding a second collar.
- The Collar 1 and Collar 2 buttons allow you to change commands between the two collars. The transmitter saves the settings for each collar so and the settings automatically change when you switch from Collar 1 to Collar 2.
- The LCD screen indicates if the transmitter is set to Collar 1 or Collar 2.
2. Training Buttons
Button A [Audible / Vibration]
- The ‘A’ button sends either an audible warning or a vibration warning to the dog’s receiver collar. The warning continues as long as you press the button (for a maximum of up to 8 seconds.)
Button B [Brief]
- Pressing the ‘B’ button sends a single brief correction (~1 second).
Button C [Continuous]
- Pressing the “C’ button sends a continuous correction for as long as you hold the button down. If the button is not released, the correction will automatically stop after 8 seconds. This is to prevent over correction.
To send additional training signals, simply press the button again. Only one signal can be transmitted at one time.
SWITCHING FROM AUDIBLE TO VIBRATION MODE
With the BigLeash, you have the option of using the “A” Button for either an Audible warning or a Vibration warning. You have the option to choose your mode of preference.
When working with 2 dogs, the two collars work independently, meaning they work under different settings of your choice.
To Switch Between Audible and Vibration:
- Turn the transmitter and the receiver collar “on”. Set to Collar 1 or Collar 2.
- Set training level to “0”.
- Hold the “A” button with the training level at “0”.
Continue holding the “A” button until about 5 seconds and then the transmitter will begin to toggle between Audible (A) and Vibration (V). The mode will display on the LCD screen.
- To set to Audible, release the “A” button while the “A” is displayed.
- To set to Vibration, release the “A” button while the“V” is displayed.
- To test the setting, reset transmitter to any training level (1-15) and press the “A” button.*
- The “A” button will remain set to either Audible mode or Vibration mode until you change settings. Collar 1 and Collar 2 are set and changed independently.
Audible and vibration intensity is always the same regardless of the training level setting, except when setting to “0” (no signal).
RECEIVER COLLAR FEATURES
The BigLeash has a battery status light and the Firefly® nightlight to help you keep track of your dog at night.
Battery Status Light
|
Blinks GREEN |
Turned on, charged |
|
Blinks RED |
Turned on, low battery |
|
Steady RED |
Plugged-in, charging |
|
Steady GREEN |
Plugged-in, fully charged |
Turn “on” the receiver collar by holding the Receiver collar and the Transmitter next to each other with the Markers aligned.
Firefly Nightlight
- To activate the Firefly light strips on Collar 1, press the Collar 1 button on the Transmitter.
- To activate the Firefly light strips on Collar 2, press the Collar 2 button on the Transmitter.
- Press the Collar 1 or Collar 2 button briefly, the light strip blinks briefly.
- Press the Collar 1 or Collar 2 button for 5 seconds, the light stays on and continues to blink. To turn “off”, press button again for 5 seconds until the light stops blinking.
- When switching between Collar 1 and Collar 2, the light strip will blink briefly on the collar which is receiving the signal from the transmitter.
The BigLeash receiver is waterproof and should withstand any type of weather.
USING THE REMOTE TRAINER
Appropriate and Proper Use
Using this device properly and appropriately directly affects the success of the training. The remote trainer should be used to train your dog in avoiding unwanted behavior and in reinforcing good behavior.
Choosing the Contact Posts
There are two sets of contact posts. The short contact posts on the receiver will work for most dogs however there is an extra set of long contact posts that works for dogs with thick coats.
The correct fit depends on the dog’s size, neck shape, coat, and skin sensitivity. The posts must get consistent contact with the skin for the dog to feel the correction. For dogs with very thick coats, longer contact posts may be needed or trimming some hair around the contact posts may help ensure proper contact.
Fitting the Receiver Collar
- Before you start training, make sure the receiver collar has the right fit.
You should be able to put your thumb between the contact posts and the dog’s neck.
Fit should be snug. To check if the fit is snug, let the dog face down or do the sniffing position and then insert your thumb between the contact posts and the dog’s neck.
- It is VERY IMPORTANT that there should be a perfect snug fit. If the collar is too loose, your dog may not receive the signal at all.
Note: The receiver collar is not to be worn for extended periods. Remove the collar when not in use so you can avoid skin irritations due to prolonged use.
TYPES OF TRAINING SIGNALS
The BigLeash trainer allows you to adjust the type, the duration and the level of the training signal according to your preference
- The “A” button provides either an audible or a vibration warning. The warning continues (up to 8 seconds) while you press the “A” button.
- The “B” button provides a brief 1 second correction (regardless of how long you hold the button down.) Press the “B” button repeatedly for a series of brief corrections.
- The “C” button provides a continuous correction (up to 8 seconds.) This allows you to give extended correction when the situation calls for it.
The type of training signal you select should depend both on the behavior you want to reinforce and the way your dog responds to the correction. The goal here is for your dog to learn that the correction can be avoided by responding appropriately.
- During the early stages of training, most dogs quickly respond to the first or second brief correction (button ‘B’). However, some dogs may need more brief corrections (or a higher training level), it really depends on the dog’s personality and level of stimulus that excites of distracts the dog.
- It is recommended that a short audible or vibration warning come before giving brief or continuous corrections. This gives your pet a “warning” so could heed before getting a higher correction.
- For very untoward behaviors, such as chasing or barking – a number of continuous corrections (button ‘C’) may be needed.
Picking the Right Training Level
There are 15 training levels to choose from. The training level really depends on your dog’s reaction. You can customize your remote trainer according to your dog’s temperament and the type of command you are trying to teach.
Each dog has different cognitive levels; some dogs will respond to low training levels; while others may need the higher ones.
Start with the lowest level
Before you start training; you need to test the dog’s response first. Starting at Level 1, use the Brief (B) button and watch for a response that should indicate a discomfort (it could be a quick tug on a leash). The goal here is to get the dog's attention without creating anxiety.
CREATING THE RIGHT ENVIRONMENT
- Always keep the training “positive”. You can make use of praises and other gestures that will reinforce positive behavior.
- Use a high happy tone when praising. Use a low and deeper tone for negative commands. If the dog seems to be very eager and energetic; keep them focused by using a calm and soothing tone; once they are focused; you can praise with enthusiasm.
- A dog’s response may change depending on the excitement or distraction he is subjected to. Remember to keep the dog’s attention on the training activity so you can get a pattern of behavior.
- Always give time for free play while giving your dog praises before or after training.
- If your dog does not seem to respond at Level 1, you can increase the training level one level at a time until you get a response from him. You may need to adjust levels while training as dogs have different reactions/responses to a situation.
DOG'S RESPONSE TO TRAINING
Dogs respond differently. Different dogs have different reactions when they feel a correction. Some dogs respond in subtle ways while others respond otherwise.
Of course; at first, your dog will not automatically understand what to do when he receives a signal from the remote trainer. You need to give him time to be acquainted with the training process. On the other hand; you need to really understand how the remote trainer works for you to effectively facilitate it.
TRAINING BASICS
Your remote trainer can be used in two ways:
1. It can be used to reinforce appropriate behaviors such as obedience commands as “Come”, “Sit”, and “Stay.”
2. It can also be used to correct inappropriate behaviors such as jumping, digging and excessive barking.
CONSISTENCY AND TIMING
- Consistency is vital for successful training. While you are training your dog; you will realize how being firm in your training will yield good results. If you correct your dog for one behavior such as trash raiding; you should correct him each time he does the act. Do not allow bad behavior on certain occasions. Make your dog realize that bad behavior will always be corrected.
- The training signal must be delivered in a timely manner. That means; if your dog does a bad behavior; he should be corrected right then and there; this is for him to realize and associate that bad behavior with the correction. Delaying the correction will cause confusion on the dog and will cause him to associate the correction with something else. So, always send the correction as the dog is doing the bad behavior.
PLAN YOUR TRAINING FOR SUCCESS
During the early phase of training, it is advised that you conduct training sessions in an open area free that is free from distractions. If the area has no fence, you need to use a long rope to keep him from leaving the area until the training session is finished.
Once your dog has learned the commands with the first setting, you can now gradually increase distractions and continue with the training so the dog gets used to training in all kinds of situations. This process is done to train the dog to continue to associate the training signal with the behavior and not with the distractions.
During the early stages of training, just limit sessions for 15-20 minutes. Just repeat the sessions regularly and frequently. Dogs easily learn by repetition and reinforcement.
Do not make it obvious to your dog that you are controlling the remote transmitter and sending signals to his collar. The dog needs to associate his behavior with the sensation of the training signal - - not to you or to the remote trainer!
TRAINING METHODS
There are many different training approaches that you can use with your dog. With a remote trainer, some professional trainers would recommend that you give an initial verbal warning before proceeding with the training correction. Some trainers would also proceed with the correction immediately as they believe that it is more effective. You can try either one; but again; it’s always best to try with the lowest level first; in this case, it is the verbal warning. Try to see whichever works best with your dog. Just remember that the key is to be consistent.
- For obedience training, do your verbal command along with the correction. So the two go together for a quicker response.
- Begin this type of training by pressing the Continuous button (‘C’). Your dog should understand that the correction stops when he responds appropriately to the command. Once he feels the correction, he will respond more quickly. You should also begin to shorten the type and duration of the correction if you see that the dog responds quickly.
- When your dog responds almost immediately to your command, you can reduce the use of the trainer or can use it only when you need to repeat teaching the command. Once the dog is fully trained and is already quick to respond, a quick vibration or audible warning may be all that you need.
BASICS IN BEHAVIOR TRAINING
After your dog has understood the basic obedience commands, it’s time to level up to more specific behavior training. All of the general and obedience training basics are prerequisites to other behavior training.
GENERAL AVOIDANCE TRAINING
- “Avoidance” training is teaching your dog to associate the correction with the behavior. This will help him learn that in order to stop feeling the correction; he must stop the behavior. Now, he learns to “avoid” the behavior.
- The use of verbal commands and/or audible/vibration alerts varies depending on the situation and the training method. There are certain acts such as digging or jumping up that you may want your dog to associate with the training correction and no verbal command or audible/vibration warning. There are also other situations such as general obedience that a verbal command and/or audible/vibration warning is necessary before giving the correction.
- When training your dog’s behavior, you have to remember that not all activities should be eliminated completely. A good example of this behavior is barking. Though some barking needs to be eliminated; you can never completely eliminate it in your dog since it is an innate ability of the dog and it is his way of communicating with others. The goal of your training should be to control problematic behavior and not to eliminate normal dog activities.
- A dog will not automatically understand what to do in the first few instances that he receives a signal from the remote trainer. It needs some time to get used to the correction and to take action in response to that correction as well.
- Don’t comfort your dog after giving a correction. This will confuse your dog if what he did was right or wrong. Be firm in disciplining your dog. What is wrong is wrong, and wrong should be corrected.
This Owner’s Guide provides general training examples for common dog behaviors. You may also seek advice from a trainer who is experienced in remote trainers.
GENERAL EXAMPLES OF BEHAVIOR TRAINING
The following examples offer the general approach of the remote trainer in addressing specific behavioral problems. Again, consistency and timing are of the essence.
Barking
- Barking is a natural part of dog behavior. Barking to dogs is what talking is to humans; it is their way of communication. Therefore dogs should be allowed to bark like a normal part of their everyday lives. You can control excessive barking but you should not eliminate the “normal” barking.
- If barking becomes excessive, use a “quiet” or “no barking” verbal cue and then back it up with a training signal from your remote trainer.
Digging
- Dogs dig for many different reasons. They may dig because they are looking for a cool place to lie down, or they may have seen an insect on the ground or they may be simply bored.
- If you need to stop a dog from digging certain areas; send a training signal the moment he starts to dig.
Chasing
- The most common chase object for dogs is cars.
- Extra care must be taken when teaching your dog not to chase cars. The dog should be away from the car when you send a training signal.
- In most cases; dogs feel distracted by something so they chase it excites them. Use of the Continuous signal (C button) and increased training level may be necessary, especially in the early stages of training your dog to stop chasing.
Jumping
- Dogs usually jump up to get other’s attention.
- When your dog is attempting to jump, command him to “sit”; once he sits; praise him and give him the attention he is seeking.
- If the remote trainer is to be used to stop dog from jumping on people, use the Brief (B) button to send a training correction whenever he jumps. Do not praise the dog when he gets off.
- Use the same approach to stop dog from jumping up to steal food from the counter or the table. If your dog usually jumps up the table when no one is around, then you may need to leave food on the counter or the table, go somewhere you can see the dog (the should not see you). Once you see the dog jump; send him the correction.
- Everybody should cooperate in this training. Family members, friends should help maintain consistency especially in stopping the dog from jumping.
Jumping on Furniture
- You can train your dog to stay off from ALL furniture, or you can train him to stay off from certain or specific furniture only. Send him a correction each time he jumps on "off-limit furniture” Any furniture that is ‘off limits’ should ALWAYS be ‘off-limits.’ Again; exercise consistency.
- Send a training signal the moment your dog starts to jump up the “off-limit” furniture. Time is of the essence of sending the correcton. Correction should be felt at the exact moment he is doing the act.
- Your dog should associate the correction with the “off-limit” furniture. Once he learns this association; he will avoid that furniture in the future.
- You can also do “conditional” training on your dog with regards to jumping on furniture. An example of this is jumping on the table. You can sometimes invite your dog to go up the table only when you ask him to; and when he does go up; he will not get corrected, instead he gets praise from you. However; if he jumps up the table without invitation he will receive the training signal. You can use a lower training level for this conditional training. During this training; make sure you do not confuse the dog.
Chewing
- Chewing for dogs is as natural as eating. It is a natural behavior. As with barking, there is acceptable and unacceptable chewing. You must first decide what can be classified as unacceptable and from orient the dog with the behavior and give him a signal each time he does unacceptable chewing.
- You need to teach your dog the things he is allowed to chew (special chew toys, bones, etc.) as well as things he is not allowed to chew (shoes, socks, garden hoses, etc.). The moment the dog starts to chew something not allowed, send the signal right away.
Aggression
- “Aggression” in dogs refers to a wide variety of behaviors that occur for many different reasons depending on the circumstances they are in. Most dogs are aggressive when guarding their territories, defending their offspring and protecting themselves.
- Dogs chase and engage in aggressive behaviors (such as biting and fighting) for a variety of reasons that differ from one dog to another.
- This trainer can be used to control dogs who display acts of aggression. Send the signal each time the dog becomes aggressive. However; do note that this device is not intended to change the behavior of AGGRESSIVE DOGS or dogs that are innately aggressive even for no apparent reason. It can only be used for dogs who are not aggressive but every once in awhile become aggressive due to outside factors.
WARNING: This product is not designed for use with dogs that have a history of aggressive behavior. Consult a qualified professional who has experience working with aggressive dogs before using this product.
TROUBLESHOOTING
The Remote Trainer Is not Working
- Check batteries. Batteries in the transmitter and the receiver should be charged.
- Check if the device is ON. Both the transmitter and receiver should be turned “on”.
- If batteries are fully charged but do not turn ON, press the “A” button on the transmitter and check the LCD screen. Wait for the transmitter icon display then follow the reprogramming instructions on page 24. If the icon does not display and reprogramming does not work, call Customer Service.
Dog Does Not Seem To Respond
- Check if the collar is a snug fit. The ends of the contact posts should touch the dog’s neck.
- Check the training level. If the level is set to “0” (safety mode), then there will be no signal sent to the receiver. If it is set on low, try to increase by one level at a time. See Training Level instructions on page 6.
- If the transmitter is programmed for use with 2 dogs, check if it is set to the correct collar.
The Transmitter Range Is Reduced
- The range is affected by environmental factors such as ground terrain, weather, buildings, and other obstructions.
- For optimum range; hold the transmitter with the antenna pointed toward the sky, not towards the dog.
- Keep your fingers away from the antenna. Touching the antenna will greatly reduce the range.
The Battery Does Not Seem To Charge
- Be sure the plugs are inserted properly.
- Use only the battery charger provided with your trainer.
- If the battery is not charging as long as it used to, it may be time to replace the battery.
No Communication Link
- The link can usually be restored by turning the system on/off or by charging the transmitter and receiver.
- Transmitters and receivers may need to be reprogrammed to recognize each other.
Cold Weather Performance
- All batteries are prone to drop in voltage cold weather. Batteries also use up faster during cold weather.
- The dog may feel that the signals are not as strong during cold weather.
- During cold months, it is best to keep your device fully charged. The device is in its optimum performance at room temperature.
Programming the Receiver Collar
Adding a Second Collar
Your transmitter has been set for use with one dog but it can easily be programmed for use with two dogs. The Collar 2 has a bright orange collar strap and has a small “Dog 2” sticker on the back for easy identification.
- Before you add the second Collar to the transmitter, make sure it has been charged for at least 3 hours.
- Turn off the transmitter and the two receiver collars.
- Hold down the ‘A’ button for 10 seconds until the screen on the transmitter turns ‘on’.
- Set the TRAINING LEVEL to ‘2’.
- Press and hold down the Collar 2 button while turning the new receiver ‘on’ by aligning the receiver next to the transmitter at the alignment markers.
- Continue to hold the receiver next to the transmitter at the alignment markers while holding down the Collar 2 button.
- You will hear a series of beeps. When the series of beeps stop, you can move the receiver away from the transmitter.
- The second receiver is now programmed to the Collar 2 setting.
- Turn on the transmitter and receiver.
Re-Programming Collar 1 to the Transmitter
Follow the same steps as Adding a Second Collar, except for the following:
- Set the training level to ‘1’ (step 4).
- Hold down the ‘A’ button instead of the collar 2 button (step 5).
We'll Beat any Aussie Competitor's Price!
Here at The Dog Line, we guarantee that our prices either match the prices of competitor’s or beat them. We also offer a lot of other Reasons to Buy besides a price match guarantee.
If you see an Australian competitor having lower prices than us, simply fill in the form below with all the details and we’ll beat their price! On top of that, we will give you an *exclusive 10% discount of the difference.
| Sample | Calculation | |
| Our Price | = | $130 |
| Other Price | = | $80 |
| Difference | = | $50 |
| Discount | 10% of $50 = | $5 |
| Final Price for You | = | $75 |
Fill in the form below and we'll contact you for the price match.
Please wait, Adding it to the bowl.


1) An Australian Visa or Mastercard debit/credit card; 2) To be over 18 years of age; 3) To live in Australia
To see Afterpay's complete terms, visit https://www.afterpay.com.au/terms